Appearance Model Prototypes: Design & Marketing Powerhouse
Your team has nailed the concept for a physical product to anchor your next big campaign. The deck looks incredible, but how do you get the client truly excited and confident enough to sign off? You put something real in their hands. An appearance model prototype is the answer. It’s a non-functional, aesthetically perfect replica that transforms your design from a 2D render into a tangible object. It allows you to validate every color, finish, and curve, ensuring there are no surprises down the line. This guide will show you how this critical asset helps you manage stakeholder expectations and move into production with total alignment.
Key Takeaways
Get Tangible Buy-In: An appearance model transforms your concept from a render into a physical object everyone can hold. Use it to align stakeholders, gather specific feedback, and lock in aesthetic decisions before you commit to expensive production tooling.
Demand a Flawless Finish: A great appearance model is defined by its details. It must be a perfect physical match to your CAD data in size and shape, while also being expertly finished to replicate the exact colors, textures, and graphics of the final product.
Choose a Partner, Not Just a Vendor: Your prototyping service should be more than a supplier; they should be an extension of your creative team. Partner with an expert who offers strategic advice on materials and engineering, understands agency deadlines, and can translate your vision into a premium physical product.
What Is an Appearance Model Prototype?
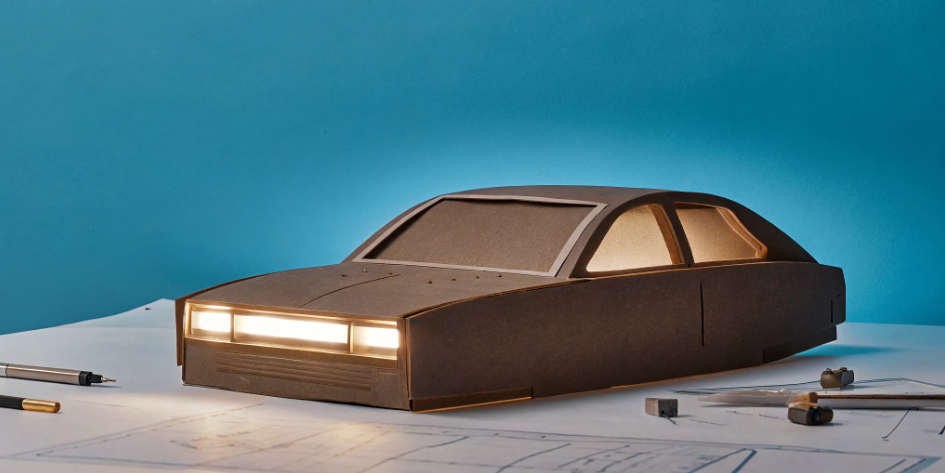
Think of an appearance model as your product’s stunt double—it looks identical to the hero but doesn’t need to perform any of the action scenes. It’s a high-fidelity, non-functional model created to show exactly how a finished product will look and feel. For creative agencies, this is a powerful tool. It transforms a concept from a slide deck into something a client can hold in their hands. It’s not about proving that the electronics work; it’s about proving the design works. An appearance model sells the vision, secures buy-in, and gets everyone excited about what’s to come.
What It Is and Why It Matters
An appearance model prototype is a tangible, 3D representation of your product idea, focusing entirely on aesthetics. It’s built to exact size, shape, color, and finish specifications, making it look just like the final product that will hit the shelves. In fact, these models are often so meticulously crafted they can look even more polished than the first production units. For agencies, this is your secret weapon for a client presentation or a stakeholder pitch. It makes the abstract real, allowing you to showcase a physical product experience long before you commit to expensive manufacturing tooling. It’s the difference between saying, “Imagine this,” and saying, “Here it is.”
Key Characteristics of a High-Quality Model
A truly effective appearance model is all about the details. It’s not just a rough 3D print; it’s a piece of craftsmanship. The surfaces should be perfectly smooth, with curves that flow exactly as designed. Colors must be precisely matched to your brand’s Pantone specifications, and the finish—whether it’s high-gloss, soft-touch matte, or brushed metallic—needs to feel authentic. A great model will also feature crisp, clear graphics and logos. The goal is to create an object that is visually and tactilely indistinguishable from the final product, giving you a powerful asset for photography, marketing campaigns, and internal design validation.
How It Differs from a Functional Prototype
It’s easy to mix up appearance models and functional prototypes, but they serve two very different purposes. An appearance model is a "looks-like" prototype; its job is to represent the product's visual and physical form. A functional prototype is a "works-like" prototype; its job is to test the product's internal mechanics and electronics. A functional prototype might be a mess of wires and exposed circuit boards, but it proves the concept works. An appearance model, on the other hand, might be a solid block of resin, but it looks flawless. Both are critical stages in the product development process, but you use them to answer different questions. For a pitch, you lead with appearance. For engineering validation, you rely on function.
Why Your Project Needs an Appearance Model
Moving a product idea from a sketch or a render into the real world is a huge leap. An appearance model prototype is the bridge that makes this transition smooth, strategic, and successful. Think of it as a high-fidelity, non-functional version of your final product. It looks and feels exactly like the real thing—from its precise color and texture to its weight and finish—but without the working electronics or complex internal mechanics. For creative agencies, this is more than just a model; it's a powerful tool for communication and validation.
Before you commit to expensive manufacturing tooling, an appearance model gives you something tangible to hold, review, and share. It transforms an abstract concept into a physical reality, allowing your team, stakeholders, and clients to see and feel the design intent firsthand. This step is crucial for aligning everyone's vision, gathering meaningful feedback, and de-risking the entire project. It helps you spot potential issues with form, ergonomics, or finish early on, when changes are still easy and affordable to make. Ultimately, an appearance model ensures that the product you’re creating is not only beautiful but also perfectly aligned with your campaign goals and brand standards before you press "go" on production.
Get Everyone on the Same Page, Visually
Digital renders are great, but they can be misleading. Colors look different on every screen, and it’s impossible to judge scale, weight, or texture from a picture. An appearance model solves this by putting a physical artifact in the room. When your creative team, your client, and your engineering partner can all hold the same object, ambiguity disappears. Everyone can agree on the specific shade of blue, the feel of a matte finish, or the way a curve catches the light. This shared physical understanding is critical for effective stakeholder management and ensures there are no surprises down the line. It becomes the single source of truth for the product's aesthetic, perfect for internal reviews, client presentations, and even trade show displays.
Gather Better Feedback, Faster
Asking for feedback on a digital concept often results in vague comments. But when you hand someone a realistic model, the feedback becomes instantly more specific and actionable. Users and clients can comment on how the product feels in their hands, whether it’s too heavy, or if a particular texture feels premium or cheap. This type of hands-on, user-centered feedback is invaluable for refining the design. By testing ideas early with a tangible prototype, you can validate your creative choices and reduce the risk of launching a product that misses the mark. It’s a fast and effective way to ensure the final design will resonate with its intended audience and meet your client's expectations.
Create Marketing Assets Before Production
One of the biggest advantages of an appearance model is its ability to accelerate your marketing timeline. Because these prototypes are visually identical to the final product, you can use them for professional photoshoots, social media content, and even video ads long before the first production run is complete. This gives your team a massive head start on building hype and preparing launch campaign assets. Instead of waiting for manufacturing to finish, you can have your entire product launch strategy ready to execute. This parallel workflow saves precious time, allowing you to hit the market with polished, compelling creative from day one.
Validate Your Design Without a Huge Investment
Committing to manufacturing involves significant costs, especially for tooling and molds, which can run into the tens or even hundreds of thousands of dollars. An appearance model is a smart, upfront investment that helps you validate every aesthetic detail before you lock in these major expenses. Discovering that a color is off or a logo placement feels wrong after tooling is made is a costly and time-consuming mistake. An appearance model allows you to catch these issues when they are still simple to fix. It’s a critical step in the design for manufacturing (DFM) process, ensuring your design is perfect before you move into mass production and protecting your project budget from unforeseen revisions.
How to Create a High-Impact Appearance Model
Turning a digital concept into a physical object that wows stakeholders and looks incredible on camera is an art form. A high-impact appearance model isn’t just a 3D print; it’s a carefully crafted replica that sells the vision of the final product. Getting it right involves a mix of the right technology, materials, and hands-on craftsmanship. Here’s how you can guide the process to ensure your model makes the best possible impression.
Explore Key Prototyping Technologies
Creating a convincing appearance model starts with selecting the right tools for the job. The two primary methods are CNC machining and 3D printing. CNC machining carves the model from a solid block of material, offering incredible precision and smooth surfaces. On the other hand, advanced 3D printing technologies like PolyJet and SLA can produce complex geometries and fine details quickly.
The real magic often happens when you combine these methods. A skilled prototyping partner might CNC machine the main housing for a perfect finish, 3D print intricate internal components or textures, and then seamlessly assemble them into one flawless piece. This hybrid approach allows you to get the best of both worlds—precision where it counts and complexity where it’s needed.
Choose the Right Materials and Finishes
An appearance model’s success hinges on how well it mimics the final product’s look and feel. This is where material selection and finishing come into play. Your model can be built from various materials, like plastics that simulate production-grade polymers or even metals for key components. A great partner can expertly combine these so that once the model is painted and finished, the seams are completely invisible.
The finishing process is what truly brings the model to life. This includes applying precise colors, textures, and graphics (a process known as CMF design). Think about achieving that perfect matte texture, a high-gloss sheen, or a soft-touch feel. These details are what make a prototype feel less like a model and more like the real deal.
Balance Visual Appeal with Technical Accuracy
Appearance models are often described as "all show and no go." While they aren’t meant to be functional, they absolutely must be technically accurate. This means the model should perfectly match the dimensions, proportions, and form of your final CAD design. This precision is non-negotiable, as the model will be used for critical photography, stakeholder approvals, and even initial user feedback on ergonomics.
The goal is to create a visually stunning object that is a true physical representation of your design intent. It needs to look right from every angle and feel right in your hands. Don’t cut corners on dimensional accuracy for the sake of aesthetics; a high-quality model delivers both without compromise, ensuring what you show is what will eventually be manufactured.
A Look at the Production Process
Creating a world-class appearance model is a hands-on, craft-driven process. After the parts are machined or printed, skilled technicians take over. They meticulously sand, prime, and paint each component, often by hand, to achieve a flawless finish. They apply graphics, assemble the pieces, and perform a final quality check to ensure every detail is perfect. This level of craftsmanship is what separates a basic 3D print from a truly impressive appearance model.
Because this process is labor-intensive, it’s important to budget for prototyping accordingly. The cost reflects the expertise and time required to create a model that can stand up to the scrutiny of a camera lens or a CEO. Think of it as an investment in making a powerful first impression.
How to Handle Common Prototyping Hurdles
Bringing a physical product to life is an exciting process, but it rarely follows a perfectly straight line. From shifting client expectations to technical roadblocks, hurdles are a natural part of the journey. The key isn’t to avoid challenges altogether—it’s to anticipate them and have a clear plan for handling them when they arise. A great prototyping partner can guide you through these moments, but understanding the common sticking points yourself will make your entire project run more smoothly. By treating prototyping as a dynamic, iterative part of your creative workflow, you can turn potential problems into opportunities for refinement and innovation.
Align Stakeholder Expectations
One of the biggest hurdles in any creative project is making sure everyone shares the same vision. This is especially true when creating a physical product. Your creative director, the client’s brand manager, and your engineering partner might all have slightly different ideas about the final outcome. An appearance model serves as a single source of truth, giving everyone a tangible object to react to. To prevent misalignment, it’s essential to use a structured approach where feedback is gathered at specific milestones. This ensures that key decisions about form, color, and finish are approved by all stakeholders before moving forward, keeping the project on schedule and on budget.
Know When to Use Functional vs. Appearance Models
Not all prototypes are created equal, and using the right type for the right purpose is critical. An appearance model is perfect for validating aesthetics, getting client sign-off on a design, or creating assets for a pitch deck. A functional prototype, on the other hand, is built to test mechanics and electronics. For many agency projects, like an influencer kit or a branded award, the look and feel are all that matter. Choosing an appearance model in these cases saves significant time and money. The decision between a working prototype or appearance model should be a strategic one based on your project’s specific goals.
Create a Solid Feedback Loop
A prototype isn’t the final word; it’s the start of a conversation. The goal is to gather targeted feedback that helps refine the design. Instead of just asking, “Do you like it?” guide the conversation with specific questions about the product’s weight, texture, and perceived quality. Establishing a solid feedback loop where comments are collected, organized, and addressed systematically is crucial for continuous improvement. This iterative process allows you to make small, informed adjustments that add up to a much stronger final product. It transforms feedback from a simple opinion into an actionable tool for making the design better with each version.
Integrate Prototypes into Your Workflow
Too often, prototyping is treated as a final step before production rather than a tool for exploration. To get the most out of the process, you should integrate prototypes into your workflow from the very beginning. Think of it as a 3D mood board or a physical sketch. Budget for it in your initial proposal and build time for it in your project timeline. When you plan for prototyping early, you can use models to test wild ideas, compare different design directions, and solve ergonomic challenges long before you’ve committed to a final concept. This makes the entire creative process more flexible, informed, and ultimately, more successful.
How to Choose the Right Prototyping Partner
Finding the right prototyping partner is less about finding a vendor and more about finding a collaborator who gets your creative vision and the pressures of agency life. The success of your physical campaign asset—whether it’s a custom influencer kit or a branded product—hinges on their ability to translate your concept into a tangible, high-quality object. A great partner doesn’t just make things; they solve problems, offer material suggestions, and understand that a deadline is a deadline. They become an extension of your team, bringing the technical and engineering know-how that makes your creative work shine in the real world.
Your partner’s capabilities directly impact the final product. You need a team that can deliver on aesthetics without sacrificing function or manufacturability. They should be able to look at your design and immediately see how to build it, what materials will work best, and how to achieve that perfect finish you promised the client. This relationship is crucial for turning ambitious ideas into physical realities that feel premium and look incredible. The right choice gives you confidence that the final prototype will not only meet but exceed your client’s expectations, making the entire project run smoother from start to finish.
What to Look for in a Prototyping Service
When you’re vetting potential partners, focus on the factors that matter most for high-stakes agency projects. First, look for a team that guarantees both speed and precision. You need quick turnarounds to meet campaign timelines, but not at the expense of quality. Ask about their typical lead times and their process for ensuring tight tolerances.
Next, consider their range of materials and finishing options. Your partner should have an extensive library of materials to match your design’s specific needs, from durable plastics to premium metals. Finally, evaluate their communication style. You want a responsive, collaborative partner who provides clear updates and acts as a strategic guide. Finding the right fit often comes down to a balance of quality, speed, and their ability to function as one of the ideal rapid prototyping companies for your specific project.
Leading Prototyping Partners to Consider
To help you get started, here are a few of the top players in the prototyping space. Each offers a different set of strengths, so your choice will depend on your project's specific needs—whether it's speed, material complexity, or the need for a deeply collaborative design and engineering partner.
Jackson Hedden Inc.
As an industrial design and engineering firm, we specialize in turning creative concepts into production-ready products. We’re built for agency partnerships, acting as your dedicated product development team. We combine high-end aesthetic design with robust engineering to ensure your prototype is not only beautiful but also functional and manufacturable. We’re the right fit when you need a hands-on, strategic partner to guide your project from a sketch to a flawless physical asset.
Protolabs
Protolabs is known for its incredible speed. Their automated quoting system and rapid manufacturing processes make them a go-to for projects with extremely tight deadlines. If you need a part or model produced in just a few days, they are one of the fastest options available.
3D Systems
A true pioneer in the 3D printing world, 3D Systems offers deep expertise and a vast array of advanced additive manufacturing technologies. They are an excellent choice for projects involving complex geometries or requiring specialized 3D printing solutions that other services may not offer.
Stratasys Direct Manufacturing
Stratasys is another leader in additive manufacturing, offering a huge selection of advanced materials and production-grade technologies. They are a strong partner for projects that demand specific, high-performance material properties or require a prototype that closely mimics a final production part.
Xometry
Xometry operates as a vast marketplace for manufacturing services. You can upload your design and receive instant quotes from a network of suppliers. This makes it a great tool for comparing prices and capabilities, especially for simpler projects where budget and speed are the main drivers.
How to Evaluate Quality, Expertise, and Service
Once you have a shortlist, it’s time to dig deeper. Start by assessing how well their capabilities match your design’s complexity. A simple branded object has different needs than an interactive electronic device. Be direct and ask if they have experience with projects similar to yours. Provide your CAD files and see what kind of feedback they offer—a good partner will often suggest refinements.
Next, confirm their material expertise. Don’t just ask if they have a material; ask how it behaves and if it’s the right choice for your application. Finally, get a clear picture of the total cost and timeline, including any finishing or assembly steps. Understanding their process and choosing the right prototyping method upfront prevents surprises and ensures your project stays on track and on budget.
Related Articles
How to Get a Product Prototype: A Simple Guide — Jackson Hedden
Get a Prototype Made Fast: The Ultimate Guide — Jackson Hedden
8 Steps to Find a Product Designer for Your Team — Jackson Hedden
Why Industrial Design Is the Secret Weapon of Top Consumer Brands — Jackson Hedden
Frequently Asked Questions
How much should I budget for an appearance model? The cost can vary quite a bit, depending on the model's size, complexity, and the level of finish required. Think of it as commissioning a piece of custom craftsmanship rather than just printing a file. A simple, single-piece model will cost less than a complex assembly with multiple colors and textures. It’s best to get a quote from your partner, but as a rule of thumb, plan to invest in a way that reflects the project's importance. This upfront cost protects you from much larger expenses, like re-making manufacturing tools, down the road.
How long does it typically take to create one? While some rapid prototyping services can turn parts around in a few days, a high-quality appearance model usually takes longer. The process involves not just the initial printing or machining, but also significant hands-on finishing work like sanding, painting, and assembly. For a truly polished model that’s ready for a photoshoot or a major client presentation, it’s wise to plan for a timeline of one to three weeks. Always discuss your deadline with your partner upfront so they can build a realistic schedule.
Can an appearance model have any simple functions, like a clicking button or a light? Absolutely. While an appearance model's main job is to look good, it can certainly incorporate simple mechanical or electronic elements to better sell the concept. This is often called a "looks-like, feels-like" prototype. For example, we can add weights to mimic the final product's heft, magnets for a satisfying snap-fit closure, or even a basic LED to show where an indicator light will be. These small touches make the model more convincing and help stakeholders better understand the intended user experience.
Why can't we just use our office 3D printer? An office 3D printer is great for quick, rough mockups to check form and scale. However, it can't produce the flawless, production-level finish needed for a client presentation or marketing photoshoot. A professional appearance model is created using advanced technologies and then undergoes a meticulous finishing process by skilled technicians. They use automotive-grade paints, apply perfect graphics, and create textures that feel authentic. That level of craftsmanship is what makes the model look and feel like a real, market-ready product.
At what point in our creative process should we bring in a partner? The sooner, the better. You don't need a finalized CAD model to start the conversation. Engaging a partner when you have a solid concept or even a well-developed sketch can be incredibly helpful. They can provide early feedback on manufacturability, suggest materials, and help you budget for the physical components of your campaign. Bringing them in early makes the entire process more collaborative and ensures the final design is both beautiful and buildable without any last-minute surprises.