The Essential Guide to CNC Prototype Parts
Let’s be honest, terms like "subtractive manufacturing" can sound overly technical and intimidating, especially for creatives. But the concept is simple: think of a highly skilled robotic sculptor that carves your design from a solid block of material. This process gives you incredible freedom to create strong, detailed, and functional objects that 3D printing can’t match. It’s the secret to producing everything from sleek electronics to custom-branded merchandise that feels substantial and premium. We’ll break down how cnc prototype parts are made and show you how to prepare your designs for a smooth, successful production run.
Key Takeaways
- Choose CNC for strength and material accuracy: Unlike 3D printing, CNC machining carves parts from solid blocks of production-grade materials. This gives you a prototype that is strong enough for real-world testing and has the authentic look and feel of a final product, perfect for high-stakes client presentations or campaign photoshoots.
- Smart design choices control your budget and timeline: Simple decisions, like rounding internal corners or specifying tight tolerances only where necessary, make a huge difference. Following Design for Manufacturability (DFM) principles helps your engineering partner produce your part faster and more affordably, ensuring your project stays on track.
- A great partner is a strategic collaborator, not just a supplier: When choosing a CNC shop, look beyond the quote. Prioritize partners who provide design feedback, communicate proactively about project status, and have a clear quality control process. This ensures a smooth workflow and a final part that perfectly matches your creative vision.
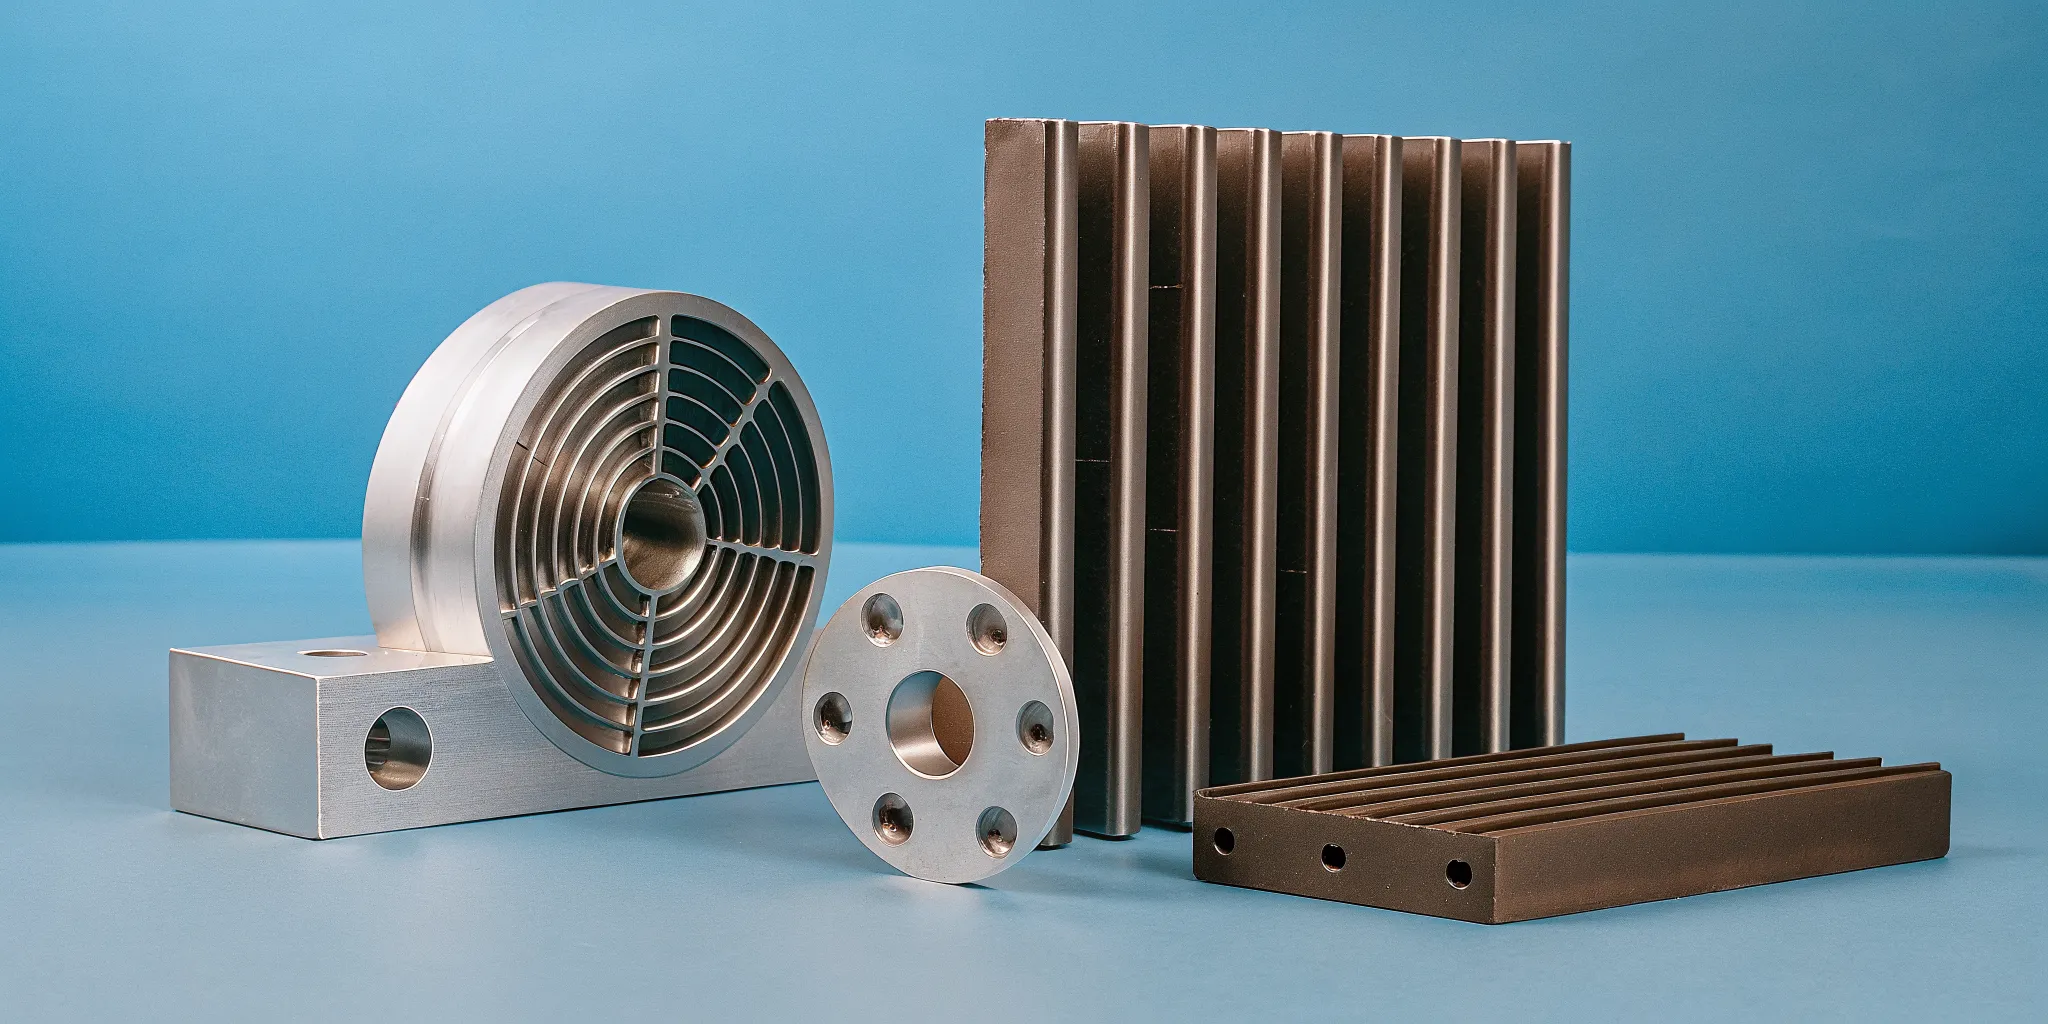
What Exactly Are CNC Prototype Parts?
Let’s start with the basics. CNC stands for Computer Numerical Control, which is a fancy way of saying we use computers to control high-precision machines. So, a CNC prototype part is a physical model of your product idea, carved from a solid block of production-grade material using this automated process. Think of it as the first tangible version of your digital design, something you can hold in your hand, test for functionality, and present to a client with confidence.
For creative agencies, this is where your brilliant campaign idea or branded product concept leaves the screen and enters the real world. CNC prototyping is a critical step in modern product development because it creates parts that are not only visually accurate but also strong and functional enough for real-world testing. Unlike some other prototyping methods that produce fragile models, CNC parts are made from materials like aluminum, steel, or durable plastics, so they perform just like the final product will. This process is perfect for creating small batches or even a single, high-fidelity prototype, giving you a tangible asset to build an entire campaign around.
How Does CNC Machining Work?
The best way to understand CNC machining is to picture a highly skilled robotic sculptor. The process starts with a 3D digital design, usually a CAD model, which acts as the blueprint. This digital file is translated into instructions for the CNC machine. The machine then takes a solid block of your chosen material, like aluminum or acrylic, and carefully carves away the excess until only your final part remains.
This is what’s known as a subtractive manufacturing process. It’s the opposite of 3D printing, which adds material layer by layer. By cutting from a solid block, CNC machining produces parts with excellent structural integrity and incredibly tight tolerances. This precision allows you to test the form, fit, and function of your design, ensuring everything works exactly as intended before you commit to a larger production run.
CNC vs. Traditional Manufacturing: What's the Difference?
The biggest difference between CNC machining and traditional manufacturing methods like injection molding comes down to tooling. Traditional methods often require creating expensive custom molds or dies, which can take weeks or months to produce. This makes sense for manufacturing thousands of identical items, but it’s not practical for creating just one or a handful of prototypes.
CNC machining, on the other hand, requires no custom tooling. It works directly from your digital file, giving you the flexibility to create complex geometries and custom designs without a massive upfront investment. This is a game-changer for agencies needing unique, tailored solutions for a specific campaign or client. Whether it’s a custom influencer package or a one-of-a-kind branded object, CNC allows you to produce bespoke physical products quickly and cost-effectively.
Choosing the Right Material for Your CNC Prototype
Choosing the right material for your CNC prototype is one of the most critical decisions you’ll make. It’s about more than just specs on a sheet; it’s about defining the entire sensory experience of your product. Think about it: the cool, reassuring weight of metal in your hand, the smooth finish of a high-quality polymer, the durability that tells a user this product is built to last. For agencies creating physical assets for campaigns or branded merchandise, the material is a core part of the story you’re telling. It directly influences how people perceive the brand and the product itself.
Beyond the look and feel, your material choice has major practical implications. It dictates the prototype’s strength, durability, and how it will perform under real-world conditions. It also plays a huge role in the overall cost and timeline of your project. A material that’s difficult to machine will take longer and cost more, while a more common option might get you a prototype faster and on budget. The goal is to find that perfect sweet spot where aesthetics, function, and manufacturability meet. This decision sets the stage for a successful prototype and provides a realistic roadmap for potential mass production down the line. Let's break down the most common options to help you make an informed choice.
Common Metals for CNC Prototyping
When you need strength, durability, and a premium feel, metals are an excellent choice. Aluminum is a popular go-to because it’s lightweight yet strong, easy to machine, and has a clean, modern aesthetic perfect for consumer electronics or high-end packaging. For parts that need to be tougher, stainless steel offers superior durability and corrosion resistance, making it ideal for products exposed to the elements. Other options like brass and copper provide unique visual appeal with their warm tones, while titanium offers an incredible strength-to-weight ratio for high-performance applications. Each metal brings a different character to your prototype, so the choice often comes down to the specific functional needs and the desired brand impression.
Plastics and Polymers for Prototyping
Plastics offer incredible versatility and are often more cost-effective than metals, making them perfect for a wide range of prototypes. Materials like ABS are workhorses; they’re tough, impact-resistant, and easy to finish, which is why they’re used in everything from LEGO bricks to automotive parts. If you need something with more flexibility or wear resistance, Nylon is a great option. For transparent parts, like a window or a light pipe in a device, Polycarbonate (PC) delivers glass-like clarity with far greater durability. These materials are fantastic for creating functional prototypes that closely simulate the look, feel, and performance of a final, injection-molded product, allowing you to test your design thoroughly before committing to expensive tooling.
How Your Material Choice Affects the Final Product
Your material choice for the prototype does more than just define the test unit; it’s a dress rehearsal for mass production. The material directly impacts the final product’s performance, appearance, and cost. Prototyping with a production-intent material gives you the most accurate feedback on how your product will function in the real world. It’s a chance to catch potential issues early. For example, a design that works perfectly in a strong, rigid plastic might fail if the final product needs to be made from a more flexible one. Balancing cost and performance is key. While an exotic material might seem perfect for a one-off showpiece, you have to consider if it’s a manufacturable design for a larger run. This strategic thinking ensures your amazing prototype can become an equally amazing final product.
Why Use CNC for Your Prototypes?
When you’re bringing a physical product to life for a campaign, the prototype is your moment of truth. It’s the first time your client, your team, and your audience can actually hold the idea in their hands. This is where the digital concept becomes a tangible reality, and it needs to be perfect. Choosing the right prototyping method is critical, and for most high-impact agency projects, CNC machining is the clear winner.
So, why is CNC (Computer Numerical Control) machining our go-to for creating stunning, functional prototypes? It comes down to three key advantages that align perfectly with the demands of agency work: speed, precision, and cost-effectiveness for small batches. CNC isn’t just for industrial parts; it’s a versatile process that can create everything from sleek consumer electronics to intricate branded objects. It allows you to move from a digital design to a physical, production-grade part with incredible efficiency, ensuring your creative vision is executed flawlessly without blowing your timeline or budget.
Get Prototypes Faster
In the agency world, deadlines are everything. Whether you’re preparing for a client pitch or a product launch, you don’t have weeks to wait for a prototype. CNC machining is one of the fastest ways to get a high-fidelity, functional part in your hands. Because the process works directly from a digital CAD file, there’s no need to create molds or tooling. A machine can start cutting your part almost immediately.
This direct digital-to-physical workflow means you can get custom parts made in as little as one day. This speed is a game-changer, allowing you to quickly test a design, get client feedback, and make revisions without derailing your project schedule. When you need to validate a concept under pressure, nothing beats the rapid turnaround of CNC.
Achieve Unmatched Precision and Accuracy
A prototype should be an exact representation of your final product, and CNC machining delivers unparalleled precision. These machines are guided by computer code, translating your digital design into a physical object with incredible accuracy. This process removes the potential for human error, ensuring every curve, edge, and feature is exactly as you intended.
This level of precision is essential for both form and function. For a branded object, it means the aesthetics will be flawless. For a functional device, it ensures all the components fit together perfectly. CNC machining is a subtractive manufacturing process, carving your part from a solid block of material to achieve tight tolerances. The result is a consistent, repeatable quality that you can rely on for client presentations and user testing.
Keep Costs Down on Small Batches
It’s a common myth that custom manufacturing is only affordable at high volumes. While that’s true for methods like injection molding that require expensive tooling, CNC machining is incredibly cost-effective for one-off parts and small production runs. Since there are no molds to create, the setup costs are minimal, making it the perfect choice for producing a handful of items for an influencer kit, a custom award, or a proof-of-concept model.
This approach allows you to create premium, production-quality prototypes without a massive upfront investment. You can test different materials and designs affordably, giving you the creative freedom to get things just right. For agencies that need to produce unique, high-impact physical assets on a project-by-project basis, CNC provides a practical path from idea to execution.
How to Design Parts for CNC Prototyping
Bringing a digital design into the physical world is an exciting step, but it’s not as simple as hitting 'print.' To get a great CNC prototype, your design needs to be optimized for the machine that will create it. This means thinking like a machinist from the very beginning. By focusing on a few key areas like manufacturability, clear specifications, and common design hurdles, you can ensure your prototype comes out exactly as you envisioned, without costly delays or surprises. A little planning upfront makes the entire process smoother, faster, and more cost-effective.
Follow Design for Manufacturability (DFM) Principles
Design for Manufacturability, or DFM, is a practical approach to designing a part so it’s easy and efficient to make. For CNC machining, this means considering how a physical cutting tool will move across a block of material to carve out your design. Simple choices can make a huge difference. For example, rounding internal corners instead of leaving them as sharp 90-degree angles allows the round cutting tool to move smoothly, saving time and money. Adhering to DFM principles ensures your parts are not just possible to create, but also efficient and cost-effective to produce, which is critical for hitting tight campaign deadlines.
Define Your Tolerances and Specifications
Think of tolerances as the 'wiggle room' for your part’s dimensions. No manufacturing process is perfect, so a tolerance tells the machinist how much a specific measurement can vary and still be acceptable. It’s crucial to define your tolerances clearly, but be strategic. The tighter the tolerance, the more time, effort, and cost it takes to achieve. Ask yourself which features are critical. Does a hidden internal component need the same precision as the snap-fit on a lid? Specifying tight tolerances only where they matter for function or fit will keep your project on budget and on schedule.
Overcome Common Design Challenges
Every project has its hurdles, but in CNC machining, a little foresight goes a long way. Some of the most common design challenges include overly complex shapes, walls that are too thin, and deep, narrow pockets that are hard for tools to reach. Thin walls can warp or break during machining, while complex geometries might require multiple machine setups, driving up costs. One of the best ways to overcome these obstacles is to simplify your design wherever possible without compromising your vision. Sometimes, a single complex part can be redesigned as two simpler parts that are assembled later. This kind of strategic thinking makes production smoother and often results in a better final product.
What Factors Affect Prototyping Costs and Timelines?
When you're bringing a physical product to life for a campaign, every decision impacts your budget and deadline. Understanding the key drivers behind prototyping costs and timelines helps you set clear expectations with your clients and manage the project smoothly. It’s not just about the final price tag; it’s about making strategic choices that align with your creative vision and practical constraints.
Three main factors come into play: the material you choose, the complexity of your design, and how quickly you need the part in hand. Each one involves a trade-off. A premium material might look incredible but stretch your budget, while a highly detailed design could add days or even weeks to the production schedule. The key is to have an open conversation with your engineering partner early on. By discussing your goals for the prototype, whether it’s for a photoshoot, user testing, or a client presentation, you can find the right balance between form, function, and feasibility. This collaborative approach ensures you get a prototype that meets your creative standards without derailing your project plan.
The Impact of Material Selection
The material you choose for your prototype is one of the biggest factors influencing cost. Common materials like ABS plastic or standard aluminum alloys are readily available and relatively inexpensive. However, if your project calls for something more specialized, like stainless steel, copper, or a high-performance polymer, the price can jump significantly. It’s not just the raw material cost, either. Some materials are simply harder and take longer to machine, which adds to the overall time and expense.
Balancing cost with performance is key, especially when you need the prototype to accurately represent the final product. Choosing an exotic or premium material can give your part a specific look and feel, but it’s important to weigh that against your budget. A good engineering partner can help you explore different options, suggesting alternatives that might provide a similar aesthetic or function at a lower cost.
How Design Complexity Plays a Role
The more intricate your design, the more time and effort it takes to machine. Simple, geometric shapes with straight lines and large, open features are generally quick to produce. But once you introduce complex curves, very thin walls, deep pockets, or tiny details, the machining process becomes more involved. These features often require specialized cutting tools, slower machine speeds, and multiple setups to get right.
Think of it this way: every unique surface and feature in your 3D model has to be programmed into the CNC machine’s toolpath. Complex geometries can create challenges that require careful planning to avoid errors and ensure a high-quality finish. While CNC machining can achieve incredible detail, it’s helpful to remember that simpler designs are almost always faster and more affordable to prototype. Communicating your "must-have" features versus your "nice-to-have" ones can help your partner optimize the design for efficient production.
Balancing Speed and Budget
In the world of product development, time is always a critical factor. If you’re on a tight deadline for a client pitch or a campaign launch, you might need your prototype turned around in just a few days. Expedited timelines are definitely possible, but they usually come at a premium. Rush orders often require shuffling production schedules or running machines after hours, which adds to the cost.
Investing in a quality CNC prototype early on can actually save you money and speed up your overall project timeline. It allows you to test your design, catch potential flaws, and get a clear idea of what it will cost to manufacture at scale before you commit to a full production run. The best approach is to be upfront about your deadlines and budget from the very beginning. This allows your prototyping partner to work with you to find the right balance, perhaps by simplifying a feature or suggesting a different material to help you hit your target.
How to Choose the Right CNC Prototyping Partner
Finding the right partner is about more than just getting a part made. It’s about finding a team that can bring your creative vision to life with precision and reliability. For an agency, this relationship is critical. Your partner’s work directly reflects on you and your client. A great CNC shop acts as an extension of your team, offering technical expertise and a seamless process so you can focus on the big picture. When you’re vetting potential partners, focus on three key areas: their technical skill, their commitment to quality, and how they communicate.
Evaluate Their Technical Capabilities
This is the nuts and bolts of it. Does the shop have the right equipment and expertise for your project? Look at their list of machines and the materials they specialize in. If you’re creating a sleek aluminum enclosure for a tech product, you need a partner with experience in metal machining, not just plastics. A truly capable partner will do more than just press "go" on your file. They’ll provide design for manufacturability (DFM) feedback to catch potential issues before they become expensive problems. Ask if they have dedicated resources for quick-turn prototypes, as this can be a game-changer for tight campaign deadlines.
Look for Quality Standards and Certifications
Quality in a prototype isn't just about looking good for the client presentation (though that’s important, too). It’s about functional precision. The part must work exactly as intended. Look for partners who can show you their quality control process. While certifications like ISO 9001 are a great sign of a mature process, don't stop there. Ask for case studies or examples of similar projects they’ve worked on. A quality CNC prototype gives you a real-world preview of how your final product will perform and helps you accurately estimate manufacturing costs for a larger run, ensuring there are no surprises down the line.
Prioritize Clear Communication and Project Management
This might be the most important factor for an agency. A technically brilliant shop is useless if they miss deadlines and don’t return your calls. Your partner should make the entire process easy and transparent. Look for shops that offer modern tools like instant online quotes and order tracking portals, which streamline the workflow and keep everyone on the same page. The best partners are proactive communicators. They’ll flag a design concern, suggest a better material, or give you a heads-up on timelines. You want a collaborator who is invested in your project’s success, not just a vendor taking an order. This approach is key to effective creative project management.
What Challenges Should You Prepare For?
Even with a straightforward process like CNC machining, it’s smart to know what potential hurdles you might face. Being prepared helps you and your design partner work together smoothly to create a prototype that perfectly matches your vision. The key is knowing what to look out for and having an expert team to guide you.
Common Misconceptions About CNC Prototyping
Let's clear up a couple of myths right away. First, many people think CNC machining takes a long time, but simple prototypes can often be designed and produced quickly. Second, there's a common belief that CNC is only cost-effective for large production runs. While it’s great for that, it’s also a fantastic and viable option for low-volume manufacturing, which is perfect for creating a single hero prop for a campaign or a small batch of high-end influencer gifts. Don’t let these old ideas keep you from considering a powerful prototyping tool.
Key Considerations for Quality Control
Achieving a flawless prototype requires careful oversight. On the technical side, your engineering partner manages potential CNC machining challenges like tool wear, programming errors, and inconsistencies in raw materials. Complex geometries can also require special attention to ensure every detail is perfect. A great partner has rigorous quality control processes in place to catch these issues. This is where having an experienced team is so valuable; we handle the technical precision so you can stay focused on the creative vision.
How to Align Expectations and Specifications
The most important part of any project is clear communication. It’s crucial to align your expectations with the technical specifications from the very beginning. This involves balancing cost, appearance, and performance, especially when you’re using unique or exotic materials to get a specific look for your brand. The best way to prevent surprises is to work with a partner who can translate your creative brief into a detailed technical plan. This partnership is the best way to reduce risk in product development and ensure your final part meets your exact specifications.
When Should You Choose CNC Over Other Methods?
When you’re bringing a physical product to life for a campaign, you have a few different ways to create it. The right choice depends entirely on what you need the final piece to do. Are you just trying to get a feel for the shape and size, or do you need a fully functional item that can withstand a photoshoot, an unboxing video, or a live activation?
Deciding between manufacturing methods often comes down to two key questions. First, what is the prototype’s purpose? This will help you choose between processes like CNC machining and 3D printing. Second, how many units do you need? The answer will guide your decision on whether a method is cost-effective for your project’s scale. Let’s break down how to make the right call for your agency’s next big idea.
CNC vs. 3D Printing: Making the Right Call
The biggest difference between CNC machining and 3D printing is how they create a part. 3D printing is an additive process, building an object layer by layer from plastic filament or resin. It’s fantastic for producing quick, low-cost models to check the look and feel of a design.
CNC machining, on the other hand, is a subtractive process. It starts with a solid block of production-grade material, like aluminum or ABS plastic, and carves away the excess to reveal the final part. This means CNC prototypes are strong, durable, and functional, mirroring the quality of a mass-produced product. If you need a prototype for performance testing or a hero prop that has to look and work perfectly on camera, CNC is the way to go.
How Production Volume Influences Your Choice
It’s a common myth that CNC machining is only for large production runs. In reality, it’s an incredibly flexible option for low-volume manufacturing, which is often exactly what agencies need. Whether you’re creating 10 custom awards, 50 high-end influencer kits, or a single complex prop for an event, CNC can deliver.
Because CNC machining doesn’t require expensive molds or tooling, it’s a cost-effective way to produce small batches of premium-quality parts. This process allows for tailored solutions that match the specific needs of your campaign, no matter how complex the design. While other methods like injection molding are better for thousands of units, CNC machining hits the sweet spot for producing anywhere from one to several hundred items with precision and a high-quality finish.
Finishing and Quality Control for Your CNC Parts
Once your part comes off the CNC machine, the work isn’t quite done. The final steps, finishing and quality control, are what transform a precisely cut piece of metal or plastic into a prototype that looks and feels like a market-ready product. This stage is critical, especially when you’re creating a physical asset for a campaign or a high-end influencer package. The goal is to create a prototype that not only works perfectly but also embodies the brand’s aesthetic and quality standards.
Think of the raw machined part as a blank canvas. Finishing processes add the color, texture, and protective layers that bring your creative vision to life. At the same time, a rigorous quality control process ensures every detail, from the dimensions to the feel of a button-press, matches your design specifications. This is where engineering precision meets creative execution. A great prototype gives you the confidence to move forward with production and helps your clients see, touch, and believe in the final product. It’s an essential step for testing how a product will look, work, and perform before you commit to a full manufacturing run.
How Are Prototypes Inspected and Tested?
Every prototype should go through a detailed inspection to make sure it’s built exactly as designed. This isn’t just a quick visual check. It’s a meticulous process using precision tools like digital calipers and coordinate measuring machines (CMMs) to verify every dimension against the original CAD files. We check for critical tolerances, ensure surfaces are smooth, and confirm that all features are correctly machined. Beyond measurements, functional testing is key. We’ll check if parts fit together as intended, if moving components operate smoothly, and if the overall assembly is sound. The importance of a quality CNC prototype can't be overstated, as this step catches potential issues early, saving you time and money down the line.
Explore Your Surface Finish Options
The surface finish of your prototype has a huge impact on its look, feel, and durability. A part straight off the machine has a standard "as-milled" finish, which shows faint tool marks. While functional, you’ll likely want something more refined for a client-facing model. You can choose from a variety of custom parts finishing options to match your brand’s aesthetic. Bead blasting creates a uniform matte texture, while anodizing adds a durable, colored ceramic layer to aluminum parts. For a premium look, you might consider brushing or polishing. And of course, parts can be primed and painted in any color to perfectly match brand guidelines. The right finish makes your prototype feel less like a test part and more like the real deal.
Understand Post-Processing Capabilities
Post-processing covers any step that happens after machining and finishing to get your prototype fully functional and ready for review. This could involve several different steps depending on your project's complexity. For example, metal parts might require heat treatment to increase their strength and durability. If your design includes threaded holes for screws, we can install inserts like Helicoils to ensure strong, reliable connections. Often, a prototype is an assembly of multiple components. Post-processing includes putting all the individual CNC parts, 3D printed elements, and off-the-shelf hardware together to create a complete, working model. This comprehensive approach to CNC prototype machining ensures you receive a prototype that performs just as well as it looks.
Related Articles
- How to Choose a Rapid Prototyping Company — Jackson Hedden
- Rapid Prototyping Services: The Ultimate Guide
Frequently Asked Questions
Why should I choose CNC machining over 3D printing for my agency's project? Think of it this way: 3D printing is great for quickly checking the basic shape and size of an idea. It’s perfect for early, low-cost mockups. CNC machining is what you use when you need the prototype to look, feel, and perform like the final, market-ready product. Because it carves your part from a solid block of production-grade material like aluminum or durable plastic, the result is strong and functional. If you need a hero prop for a photoshoot or a working model for a client presentation, CNC delivers the high-fidelity quality you need.
I'm not an engineer. How much technical knowledge do I need to design a part for CNC? You don’t need to be an engineer at all. Your expertise is in the creative vision, the brand story, and the user experience. A good product development partner handles the technical side. You provide the 3D design, and we provide the Design for Manufacturability (DFM) feedback. This is a collaborative process where we suggest small adjustments, like rounding an internal corner, to ensure your design can be made efficiently and cost-effectively without compromising your vision.
How quickly can I get a CNC prototype, and what's the biggest factor affecting the timeline? The turnaround for CNC prototypes can be incredibly fast, sometimes in just a few days. The single biggest factor that influences the timeline is design complexity. A part with simple, straightforward geometry will be much quicker to machine than one with intricate curves, deep pockets, or very thin walls. These complex features require more programming, special tooling, and longer machine run times. Being clear about your deadline from the start helps your partner find the right balance between design detail and speed.
My prototype needs to match our brand's exact color and feel. What are my options? You have a wide range of options to make sure the prototype is a perfect physical representation of your brand. Beyond the inherent qualities of the metal or plastic you choose, we can apply various surface finishes. For example, we can bead blast a part for a uniform matte texture, anodize aluminum to add a durable layer of color, or even custom paint the part to match a specific Pantone value. These finishing steps are what transform a machined part into a polished, client-ready product.
Is CNC prototyping affordable for a single 'hero' prop or a small batch of influencer gifts? Yes, absolutely. This is actually one of the biggest strengths of CNC machining. Traditional manufacturing methods like injection molding require you to create expensive custom molds, which only makes sense if you’re producing thousands of units. Since CNC works directly from a digital file with no tooling required, it is an extremely cost-effective solution for producing one-off items or small runs. It’s the perfect process for creating high-value, custom physical assets for specific campaigns.