Warpage Control: How to Prevent Part Deformation
Your team lives in the world of pixels and vectors, creating stunning digital designs for physical products. But translating that perfect render into a tangible object is where things can get tricky. The laws of physics don't care about your flawless CAD model. When plastic cools, it shrinks and moves, and without expert oversight, it can twist and bend into a warped version of your original vision. This is the gap where brilliant concepts fail in production. True warpage control is about bridging that divide between digital design and physical reality, ensuring the product your client holds in their hands is every bit as perfect as the one they approved on screen.
Key Takeaways
- Build stability directly into your design: The most effective way to prevent warpage is to design it out from the beginning. Prioritize uniform wall thickness and add structural features like ribs to create a part that’s naturally resistant to the stresses of manufacturing.
- Every manufacturing choice matters: Your material selection directly impacts shrinkage and stability. Pair the right polymer with precisely tuned process controls—like injection pressure, mold temperature, and cooling time—to ensure the part solidifies uniformly.
- Solve warpage on the screen, not on the factory floor: Use simulation software to digitally test your design and predict how it will behave during molding. This proactive analysis catches potential flaws early, saving you from expensive tooling changes and production delays.
What Is Warpage (And Why Does It Matter for Your Product)?
You’ve spent months perfecting a design for a custom influencer kit or a piece of branded merchandise. The renders look flawless, the client is thrilled, and you’re ready for production. But when the first articles arrive, something is off. The lid on the custom case doesn’t snap shut, the two halves of the product don’t align perfectly, or the whole thing wobbles on a flat surface. The culprit is likely warpage.
In simple terms, warpage is when a part distorts or bends out of its intended shape after it’s been manufactured. It’s one of the most common quality issues in processes like plastic injection molding, and it happens when internal stresses cause the material to twist, bow, or curl as it cools. For any agency creating a physical product, warpage is more than a minor headache—it’s a direct threat to the quality, function, and aesthetic you promised. A warped product looks cheap, feels broken, and can completely undermine the premium experience you’re trying to create for a brand. It’s the small detail that can make a high-impact campaign asset feel like a failure.
The Different Shapes of Deformation
Warpage isn’t a one-size-fits-all defect; it shows up as bows, twists, and bends that turn your perfectly flat surfaces into subtle waves. This distortion is caused by internal stresses built up within the material. Think of it like a tug-of-war happening inside the plastic. As the part cools down after being molded, some areas cool and shrink faster than others. This uneven shrinkage creates tension, pulling the part out of alignment. This process can happen during the initial manufacturing stages, which involve intense heating and cooling, but it can also occur later if the product is exposed to heat during shipping or heavy use.
How Warpage Impacts Product Quality and Assembly
When a component is warped, even slightly, it creates a domino effect of problems. First and foremost, it makes assembly incredibly difficult. Imagine trying to fit two puzzle pieces together when one is bent. Parts that are supposed to snap or screw together seamlessly won’t align, leading to gaps, stress points, or a completely non-functional product. This can cause major production delays and drive up assembly costs. Beyond just the fit, warpage can cause parts to crack, separate, or fail over time, which means the device won't work reliably. For a branded campaign, this is a disaster. A product that breaks or feels poorly made reflects badly on the brand and can ruin the entire user experience.
What Causes Parts to Warp?
When a perfectly designed part comes out of the mold looking twisted or bent, it’s a frustrating setback that can derail timelines and budgets. This deformation, known as warpage, isn’t random. It’s a direct result of physics at play during the injection molding process. Think of it as a tug-of-war happening inside the material as it transforms from a hot liquid to a solid product. Understanding the forces behind this struggle is the first step to preventing it. The three main culprits are almost always uneven cooling, material shrinkage, and pressure imbalances. By getting these factors right, we can ensure your final product matches your vision precisely.
Uneven Cooling and Thermal Stress
The most common cause of warpage is a temperature problem. When molten plastic is injected into a mold, it needs to cool and solidify. If one area of the part cools and hardens faster than another, the slower-cooling sections will pull on the already-solid sections as they shrink. This creates internal stress that can cause the part to deform, bend, or twist. This often happens in parts with varying wall thicknesses—thicker sections hold heat longer, while thin walls cool rapidly. A well-engineered mold with strategic cooling channels is essential to ensure the entire part cools at a consistent rate, relieving that internal stress before it can compromise the part’s shape.
Material Shrinkage and Its Effects
Every plastic shrinks as it cools—it’s an unavoidable property of the material. The real issue arises when this shrinkage is not uniform across the part. The amount of material shrinkage depends heavily on the type of plastic you choose. For example, unfilled polymers tend to shrink more and are less dimensionally stable, making them more likely to warp. Adding fillers like glass or carbon fiber can reduce shrinkage and add rigidity. That’s why material selection is so critical from the very beginning. Choosing a material that balances aesthetic goals with functional stability is a key part of designing a manufacturable, warp-free product.
Pressure and Flow Imbalances During Molding
How the molten plastic enters and fills the mold cavity is just as important as how it cools. During the injection phase, the plastic needs to be packed into the mold with enough pressure to fill every detail completely. If the pressure is too low or the hold time is too short, the plastic won't be dense enough, leading to inconsistent shrinkage. The material’s flow rate also matters. If the plastic is too viscous or stiff, it might start to harden before the mold is fully packed, creating weak points and uneven density. Properly controlling the pressure and flow ensures the part is packed uniformly, which is fundamental to achieving a stable, predictable final form.
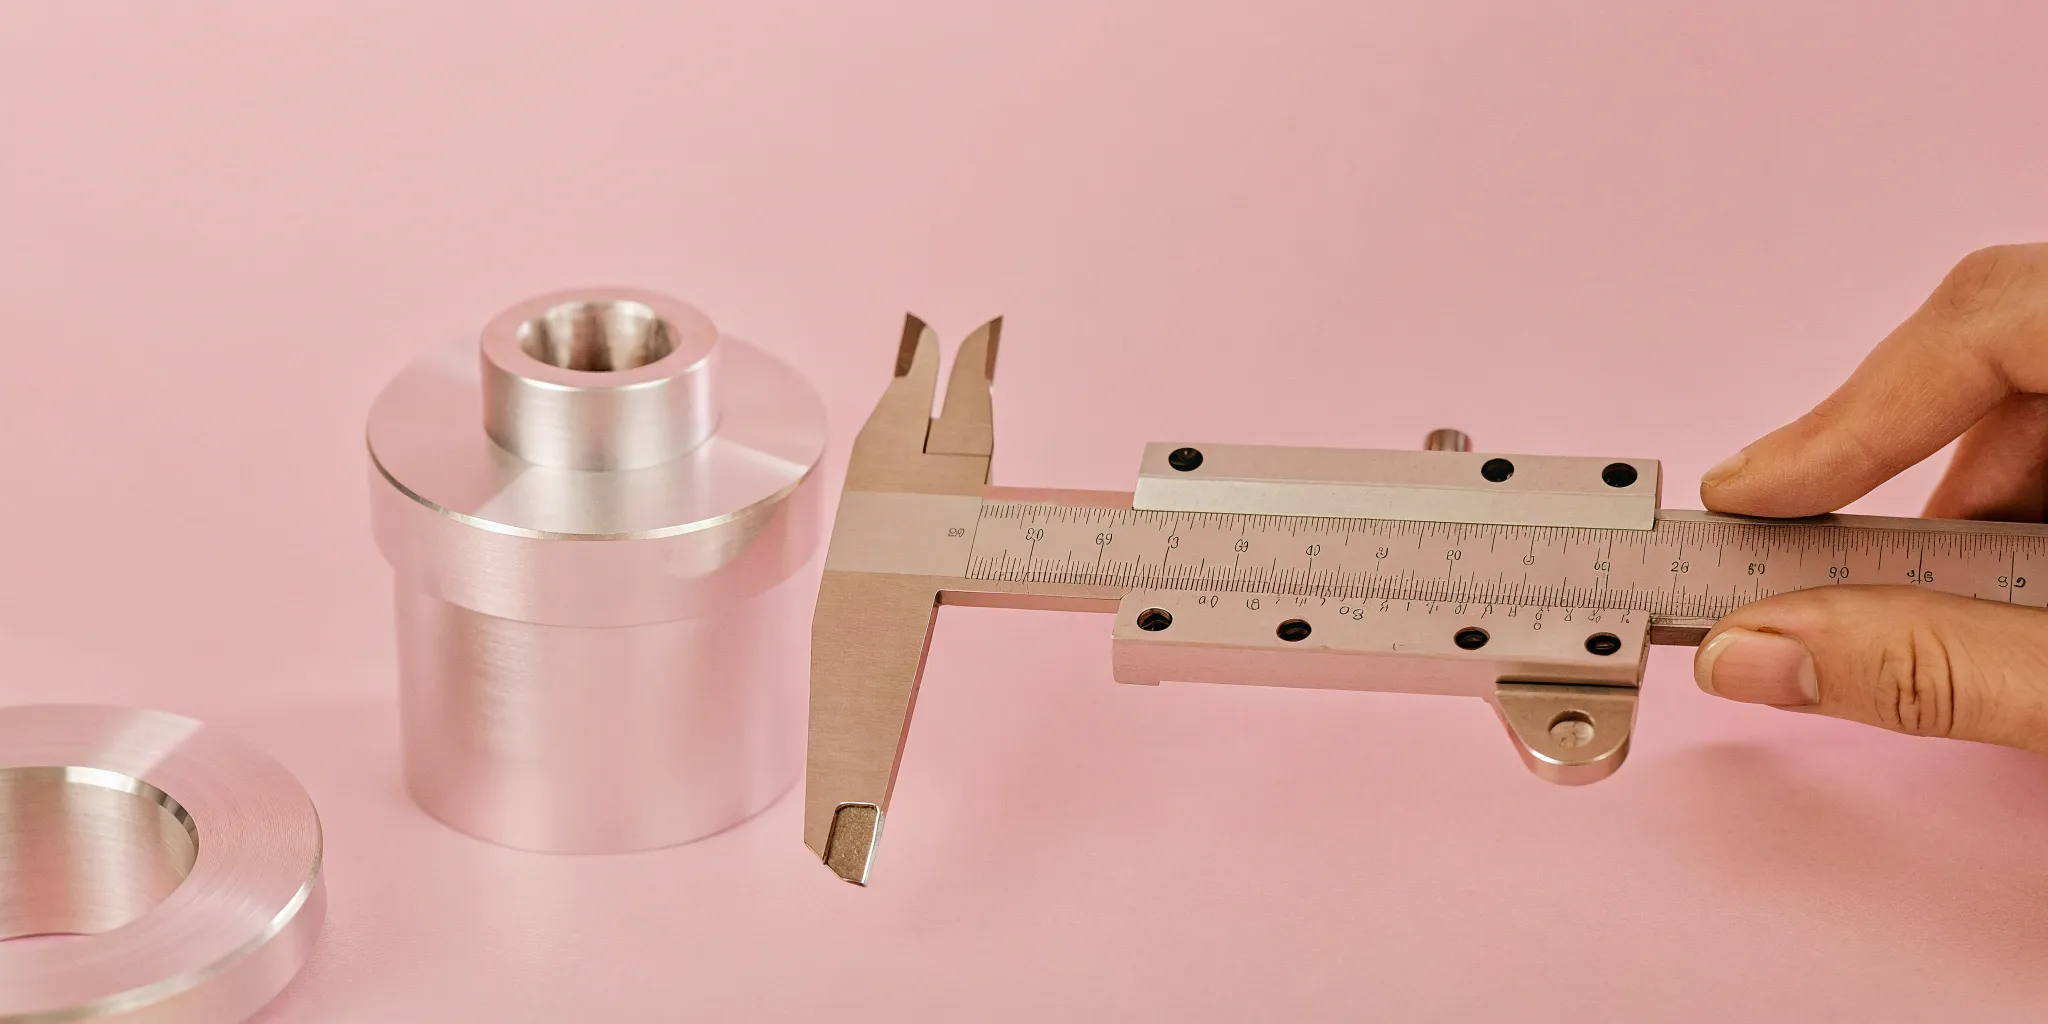
How Do You Accurately Measure Warpage?
Before you can fix a warped part, you have to understand exactly how and where it’s deformed. Just eyeballing it won’t cut it, especially when your client’s brand reputation is on the line. Accurate measurement gives us the hard data needed to diagnose the root cause—whether it’s a design flaw, a material issue, or a problem in the molding process. Think of it as the difference between saying "the part looks a little bent" and knowing "the northeast corner is deviating by 0.5 millimeters." That level of precision is what allows for targeted, effective solutions.
Getting this data isn't about guesswork; it involves specialized tools that can map a part's surface with incredible accuracy. Each method offers a different level of detail and is suited for different stages of the development process. For a high-stakes product launch or a complex assembly, we rely on advanced systems to ensure every component fits together perfectly. For simpler parts or initial checks, a more hands-on approach might be enough. The key is choosing the right tool for the job to ensure the final product is flawless, functional, and ready for its close-up.
High-Precision 3D Scanning and CMMs
When you need the most accurate and comprehensive data, we turn to high-precision 3D scanners and coordinate measuring machines (CMMs). A CMM is a device that measures the geometry of a physical object by sensing discrete points on its surface with a probe. Think of it as a hyper-accurate robotic finger that touches the part at hundreds or thousands of points to create a perfect digital map. This process captures a complete surface profile, revealing even the slightest deviations from the original CAD model. These tools are the gold standard for quality control, providing the detailed feedback necessary to make precise adjustments to the mold or manufacturing process.
Stylus-Based Measurement Techniques
Another reliable way to quantify warpage is the stylus-based method. This technique involves a probe, or stylus, that makes physical contact with the part's surface at various pre-defined points. By recording the height at each location, we can calculate the degree of warpage across the entire part. While not as fast as a full 3D scan, this method is extremely precise and excellent for verifying critical dimensions or checking specific areas of concern. It’s a focused approach that delivers clean, reliable data, making it a trusted technique for troubleshooting and validating parts before they move into mass production.
Manual Assessment with Gauges
For quick checks on the production floor, manual tools like dial gauges or feeler gauges are often used. This hands-on approach involves placing the part on a perfectly flat surface (known as a granite surface plate) and using a gauge to determine the difference in height at several locations. While this method is great for a fast pass/fail assessment, it lacks the granular detail and repeatability of automated systems like CMMs or 3D scanners. It’s a practical way to spot major issues quickly but isn’t the right tool for final quality assurance on a product where precision is paramount.
How to Design Parts to Prevent Warpage
While you can adjust materials and manufacturing processes to minimize warpage, the most effective strategy is to design it out from the very beginning. A well-engineered part is inherently more stable and less prone to deformation. This proactive approach saves time, reduces costs, and ensures the final product for your client’s campaign or merchandise line performs exactly as intended. Getting the design right means you’re not just fixing problems—you’re preventing them from ever happening.
Thinking about warpage during the industrial design phase is crucial. It’s where you can make the biggest impact with the least amount of effort. By focusing on a few key principles, you can create a robust design that stands up to the stresses of the molding process. We’ll cover three of the most important design strategies you can implement right away: maintaining uniform wall thickness, being strategic with gate and runner placement, and adding structural support with features like ribs and gussets. These aren't just abstract engineering concepts; they are practical steps that lead to a higher-quality, more reliable physical product.
Optimize Wall Thickness for Uniformity
One of the golden rules in designing for injection molding is to keep the wall thickness of your part as uniform as possible. When a part has both thick and thin sections, the thin areas cool and solidify much faster than the thick ones. The thicker sections continue to shrink as they cool, creating internal stress that pulls on the already-solid thin sections. This difference in cooling and shrinking patterns is a primary cause of warpage. By designing consistent walls, you ensure the entire part cools at a more even rate, dramatically reducing the risk of deformation.
Get Strategic with Gate and Runner Placement
Think of a gate as the entry point where molten plastic is injected into the mold cavity. Where you place this gate has a huge impact on how the material flows and fills the mold. Poor placement can create imbalances in pressure and flow, leading to uneven shrinkage and stress. As a best practice, proper gate placement is often on the thickest section of the part. This allows the plastic to flow from thick to thin areas, helping to pack the mold evenly and minimize the internal stresses that cause parts to warp after they’re ejected.
Reinforce Your Design with Ribs and Gussets
Sometimes, a part needs extra strength and stiffness, but simply making the walls thicker isn’t an option because it would violate the uniform-thickness rule. This is where ribs and gussets come in. Ribs are thin, wall-like features that add structural support, while gussets are triangular supports that reinforce areas like corners or bosses. These features add significant rigidity without adding a lot of mass or creating thick sections. By distributing stress more evenly across the part, they provide an elegant way to prevent bending and twisting without compromising the core design.
Choosing the Right Materials to Avoid Warpage
Your product’s design is only as good as the material it’s made from. When you're creating a physical product for a campaign, the material choice is one of your strongest defenses against warpage, setting the foundation for a stable, high-quality part that represents the brand perfectly. Different polymers behave in unique ways when heated and cooled, and understanding these characteristics is key to predicting and controlling their final shape. It’s not just about picking a plastic that looks good or feels right; it’s about selecting a material with the right internal structure and properties to hold its form under the pressures of manufacturing.
Making a strategic material choice early in the process saves you from costly fixes and delays down the line—something no agency timeline can afford. By considering factors like shrinkage rates, thermal stability, and structural additives from the start, we can engineer a product that is inherently resistant to deformation. This proactive approach ensures the final piece not only matches your creative vision but also meets the functional demands required for a successful launch. It's the difference between a product that wows and one that disappoints.
Amorphous vs. Semi-Crystalline Plastics
Not all plastics are created equal, especially when it comes to shrinkage. Polymers fall into two main families: amorphous and semi-crystalline. Think of amorphous plastics, like ABS or polycarbonate, as having a messy, tangled internal structure. This randomness allows them to shrink more uniformly and predictably as they cool, which significantly reduces the risk of warpage. They’re often a go-to choice for parts that require tight tolerances and a high-quality surface finish.
On the other hand, semi-crystalline plastics, such as polypropylene or nylon, have a more orderly, structured molecular arrangement. This structure makes them strong and chemically resistant, but it also causes them to shrink more—and often unevenly—as those crystalline structures form during cooling. This differential shrinkage is a primary driver of warpage. Understanding the fundamental differences between these types of polymers is the first step in selecting a material that aligns with your design goals.
The Role of High-Performance Polymers
When standard plastics won’t cut it, high-performance polymers step in. These are specialized materials engineered to withstand extreme conditions, including high temperatures, which makes them excellent candidates for controlling warpage. Materials with superior thermal properties are less prone to bending and deforming when exposed to heat during and after the molding process. This is especially critical for electronics enclosures, automotive components, or any product that generates its own heat or operates in a demanding environment.
Using these advanced materials is a strategic decision to ensure product integrity and longevity. While they may come at a higher cost, they provide the stability needed for complex geometries and thin-walled designs that are otherwise susceptible to warping. Investing in a high-performance polymer can be the key to delivering a reliable, premium product that performs flawlessly.
Using Fillers for Structural Support
Sometimes, the base polymer needs a little help. This is where fillers and reinforcements come in. By adding materials like glass fibers, carbon fibers, or mineral fillers to a base plastic, we can dramatically change its properties. These additives act like a microscopic skeleton inside the part, providing structural support that reduces overall shrinkage and increases stiffness, making the part far more resistant to bending and warping.
However, using fillers introduces its own complexities. For instance, glass-filled materials shrink differently depending on how the fibers align with the flow of the plastic into the mold. This requires careful design and simulation to control the flow path and ensure the fibers are oriented for maximum stability. When managed correctly, fillers are a powerful tool for creating strong, dimensionally accurate parts that hold their shape.
Fine-Tuning the Manufacturing Process to Reduce Warpage
Even with a flawless design and the perfect material, a part can still end up warped if the manufacturing process isn't dialed in just right. This is where deep engineering expertise becomes critical. Think of it as the difference between a home cook following a recipe and a professional chef who knows exactly how to adjust the heat and timing to get a perfect result every time. For injection molding, success comes down to managing a delicate balance of pressure, temperature, and time.
Getting these variables wrong is a fast track to creating internal stress in the part, which is the root cause of warpage. When one area of the plastic cools or solidifies faster than another, it creates a microscopic tug-of-war within the material. As the part is ejected from the mold, those stresses are released, causing it to twist or bend out of shape. Our job as your engineering partner is to fine-tune every step of the injection molding process to eliminate that stress before it starts. It’s a hands-on, data-driven approach that ensures the final product matches the CAD model with absolute precision.
Adjusting Injection Pressure and Hold Time
Imagine you’re filling a complex mold with liquid plastic. You need to push it in with enough force to reach every tiny corner and feature. That force is the injection pressure. Once it’s full, you need to keep that pressure applied for a short period—the hold time—to make sure the part is densely packed before it starts to cool. If the pressure is too low or the hold time is too short, the material won’t be packed uniformly. This can lead to uneven shrinkage as it cools, which is a primary cause of warpage. We carefully calibrate these settings to ensure the mold cavity is filled completely and consistently, creating a solid, stable part that holds its shape.
Managing Cooling Time and Temperature
The cooling phase is one of the most critical stages in preventing deformation. It might be tempting to shorten the cooling time to speed up production, but that’s a recipe for disaster. If a part is ejected from the mold while its core is still molten, it will cool unevenly in the open air, causing it to shrink and warp unpredictably. To avoid this, we establish a sufficient cooling time that allows the entire part to solidify at a controlled rate inside the mold. This ensures the part is stable and rigid enough to withstand the forces of ejection and maintain its intended geometry long after it leaves the tool.
Optimizing the Mold Temperature
It’s not just the temperature of the molten plastic that matters—the temperature of the steel mold itself plays a huge role. If the mold is too cold, the plastic that touches its surface will freeze instantly, while the material in the center of the part remains hot. This sharp temperature gradient creates significant internal stress. To prevent this, we heat the mold to an optimal temperature based on the specific plastic manufacturer’s guidelines. This allows the plastic to flow more smoothly and cool down in a much more uniform manner, drastically reducing the risk of warpage and ensuring a high-quality surface finish.
Can You Predict Warpage Before Production?
Absolutely. Instead of crossing your fingers and hoping for the best, we can spot potential warpage issues long before a single part is ever produced. This isn't guesswork; it's a strategic part of the engineering process that saves time, money, and a lot of headaches down the line. By using powerful simulation software, we can digitally test your product design against the rigors of the manufacturing process.
This virtual prototyping allows us to identify weak spots, predict how the material will behave, and make critical adjustments on the computer, not on the factory floor. For agencies managing tight deadlines and client expectations, this foresight is invaluable. It means we can catch and fix potential problems early, ensuring the physical product you deliver is as flawless as the creative concept that inspired it. This proactive approach de-risks the entire project and helps guarantee a successful outcome.
How Moldflow Analysis Works
One of the most powerful tools in our arsenal is Moldflow analysis. Think of it as a crystal ball for injection molding. This software lets us simulate exactly how melted plastic will flow into, fill, and cool inside the mold. It creates a detailed digital preview of the entire process, revealing how factors like heat, pressure, and material properties will interact.
This simulation helps us predict warpage problems before they happen. We can see where stress is likely to build up, identify areas that might cool too quickly or too slowly, and pinpoint potential defects. By analyzing this data, our engineers can refine the part design, optimize the mold’s cooling system, and dial in the manufacturing parameters—all before any steel is cut for the tooling.
The Power of Computer-Aided Engineering (CAE)
Moldflow is part of a broader category of tools known as Computer-Aided Engineering (CAE). CAE is all about using software to simulate and analyze engineering problems without needing to build physical prototypes for every single test. It’s a virtual sandbox where we can explore different design ideas, test various materials, and see how a part will perform under real-world conditions.
This ability to test ideas virtually is a game-changer. It allows us to iterate on a design rapidly, strengthening it and optimizing it for manufacturability in a fraction of the time it would take with traditional methods. For your project, this means a faster development cycle, lower risk of expensive tooling errors, and a final product that is engineered for performance from the very beginning.
The Benefits of Pre-Production Simulation
The ultimate goal of all this digital analysis is to ensure a smooth, predictable, and successful production run. Pre-production simulation is the single best way to prevent costly surprises. Finding a design flaw on a computer screen might mean a few hours of redesign work; finding that same flaw in a thousand finished parts can jeopardize an entire campaign.
By simulating the manufacturing process, we can confirm that your design is robust and ready for production. It allows us to solve challenges related to material shrinkage, cooling rates, and injection pressure before they become real-world problems. This front-loaded effort ensures that the expensive and time-consuming tooling phase is based on a proven, validated design, leading to higher-quality parts and a more efficient path to market.
How Mold and Tooling Design Can Help
Your part’s final quality is directly tied to the quality of the tool used to make it. A well-engineered mold isn’t just a cavity for plastic; it’s an active system designed to manage heat, pressure, and force with incredible precision. When your agency is on the line to deliver a physical product that looks and feels premium, the behind-the-scenes engineering of the mold and tooling is what makes it possible. Getting this right from the start saves you from costly fixes and delays down the road.
Warpage control is a complex process that involves a mix of part design, material science, and processing parameters, but it all comes together in the mold. A strategic approach to tooling design addresses the root causes of deformation before the first part is ever injected. By focusing on how the part cools, how the mold holds its shape under immense pressure, and how the finished part is removed, we can build a manufacturing process that delivers consistent, high-quality results. It’s about turning a creative concept into a manufacturable reality without compromising the vision.
Designing Effective Cooling Channels
One of the biggest factors in preventing warpage is managing how the part cools. If one area of your product cools and shrinks faster than another, internal stresses build up and cause it to bend. The solution is to design smart cooling channels directly into the mold. These channels circulate fluid—usually water—to pull heat away from the plastic part uniformly. The goal is to find the perfect cooling time, ensuring it’s not so short that the part keeps shrinking after ejection, but not so long that it wastes valuable production time.
This is where simulation software becomes essential. We can model the heat transfer and fluid dynamics to place cooling lines in the most effective locations, ensuring every part of your product solidifies at a consistent rate. After the part is molded, we can also measure warpage and flatness with precision tools to verify that the cooling strategy is working as intended. It’s a technical step, but it’s what guarantees your product holds its intended shape.
Ensuring the Mold Has Structural Integrity
An injection mold is subjected to thousands of tons of clamping pressure and intense internal forces with every cycle. If the mold itself isn’t strong enough, it can flex or distort, and those imperfections will be transferred directly to your parts. Ensuring the mold has robust structural integrity is fundamental to producing dimensionally accurate products consistently. This means using high-quality steel, designing thick mold walls, and providing adequate support throughout the tool’s structure.
Before any steel is cut, we utilize the CAD model_2016_138-151.pdf) of the product to develop a detailed mold design, complete with the feeding system and cooling channels. This digital model is then run through simulation software to analyze stresses and identify potential weak points. By reinforcing the mold structure based on these simulations, we can build a tool that withstands the rigors of mass production and reliably produces parts that match your design specifications.
Optimizing the Part Ejection System
Once the part has cooled and solidified, it needs to be pushed out of the mold cavity. This is handled by the ejection system, which typically consists of a series of pins that press against the part. If this system applies uneven force or pushes the part out at an angle, it can introduce stress into the still-warm plastic. This stress is a common cause of warpage that appears after the part has been ejected and fully cooled.
A well-designed ejection system distributes force evenly across strong, stable areas of the part, like ribs or thick walls. The number of ejector pins, their size, and their placement are all carefully considered to ensure a smooth, straight release from the mold. We also design the system for long-term reliability, making sure all components are properly aligned and lubricated to prevent sticking or binding. This attention to detail during the ejection phase is critical for maintaining the part’s intended shape and avoiding subtle, last-minute defects.
What Are the Common Challenges in Warpage Control?
Even with the best design and materials, controlling warpage can feel like a moving target. It’s not a single problem with a single solution; it’s a dynamic issue that requires constant attention and expertise. Think of it less like flipping a switch and more like balancing a complex equation where every variable affects the outcome. For creative agencies, these challenges can feel overwhelming, which is why partnering with an experienced engineering team is so critical. A good partner anticipates these hurdles and manages them behind the scenes, ensuring your creative vision is executed without a hitch.
The main difficulties come down to managing the sheer number of factors at play, maintaining strict quality standards throughout production, and ensuring seamless communication between the creative minds and the technical experts. When these elements aren't perfectly synchronized, even the most brilliant product concept can run into trouble on the manufacturing line. Let’s break down the three biggest challenges you’re likely to face.
Balancing All the Process Variables
Successfully preventing warpage is a delicate dance between part design, material choice, and the manufacturing process itself. Each element has its own set of variables, and a tiny change in one can have a ripple effect on the others. For example, the temperature of the mold, the pressure of the injection, and the speed of cooling all need to be perfectly calibrated for the specific plastic you’re using and the geometry of your part. It’s a complex process that involves the interaction of multiple factors, and there’s no universal formula. Getting it right requires deep technical knowledge and hands-on experience to adjust these variables in real-time.
Keeping Quality Control Consistent
Great results on the first prototype mean nothing if you can’t replicate them across an entire production run. Consistent quality control is essential for managing warpage effectively. This means establishing clear standards and inspection points throughout the manufacturing process, not just at the very end. For this to work, collaboration is more than a good idea—it’s a necessity. Your design, engineering, and production teams must work together to spot and solve potential issues early. Without a robust quality management system, small deviations can creep in, leading to inconsistent parts and a final product that doesn’t live up to your agency’s standards.
Aligning Your Design and Engineering Teams
Often, the biggest challenge is bridging the gap between the creative vision and the technical execution. A design might look incredible on screen, but if it doesn’t account for the physical realities of manufacturing, it’s destined for problems like warpage. This is where a breakdown between design and engineering teams can be costly. An integrated approach is crucial. When engineers are involved from the earliest design stages, they can provide feedback on things like wall thickness and rib placement to build a part that’s inherently resistant to warping. This alignment ensures the final product is both beautiful and manufacturable, without last-minute compromises.
Related Articles
Frequently Asked Questions
My team is creative, not technical. How early do we need to start thinking about warpage? You should start thinking about it the moment a physical product becomes part of your campaign. You don't need to become an engineer, but bringing an engineering partner into the early concept stages is the smartest move you can make. Small, invisible adjustments to the design at this phase can prevent major manufacturing headaches later without compromising your creative vision.
Is warpage only a problem with cheap materials? Not at all. While material choice is a huge factor, even premium, high-performance polymers can warp if the part design or manufacturing process isn't dialed in correctly. Warpage is caused by a mismatch between the material, the product's geometry, and the molding process. A great design made with the wrong material can warp, just as a poor design made with an expensive one can.
Our timeline is tight. Won't adding steps to prevent warpage slow us down? It actually does the opposite. Investing time upfront to simulate a design and engineer out potential issues saves a massive amount of time on the back end. It helps you avoid the costly and time-consuming cycle of re-tooling, re-sampling, and troubleshooting that happens when you discover a problem after parts have already been made. A little planning prevents a lot of delays.
We have a very specific aesthetic. Will adding features like ribs to prevent warpage compromise the design? This is a common concern, and it’s where good design and engineering collaboration shines. Structural features like ribs and gussets are almost always placed on the inside of a product, so they don't affect the external appearance at all. The goal is to add strength invisibly, preserving the clean lines and surfaces of your design while ensuring the part is strong enough to hold its shape.
Can't you just fix a warped part after it's made? Unfortunately, it's not that simple. Once a part has warped, the internal stresses are locked in, and you can't just bend it back into shape reliably. Forcing warped components to fit together during assembly can create new problems, like stress cracks or a product that fails over time. The only real fix is to address the root cause in the design, material, or manufacturing process, which is why prevention is everything.