What is Tooling T0, T1, T2? A Complete Guide
As a creative agency, you excel at building brands and campaigns, but the world of manufacturing can feel like a foreign language. When it’s time to produce a physical product, you need a clear roadmap. The tooling t0 t1 t2 sampling process is that map. It breaks down the complex task of perfecting a manufacturing mold into a series of simple, logical checkpoints. Understanding what happens at each stage gives you the vocabulary and confidence to manage this part of your project effectively. It empowers you to ask the right questions, provide clear feedback, and guide your product from an initial test shot to a production-ready masterpiece.
Key Takeaways
- Know What to Expect at Each Stage: Treat the trials as a sequence. T0 is a basic function check for the mold, T1 is your first chance to review the physical design, and T2 is the refined version that confirms your feedback was implemented correctly.
- Catch Problems Early to Protect Your Budget: The trial process is your best defense against costly production errors. A small tool adjustment after the T1 review is a simple fix, while discovering a flaw in thousands of finished products can derail your entire project.
- Provide Clear, Actionable Feedback: Vague comments won't work. Your most important job is to give specific, documented notes on the T1 samples, using annotated photos and precise measurements to ensure your manufacturer knows exactly what to change.
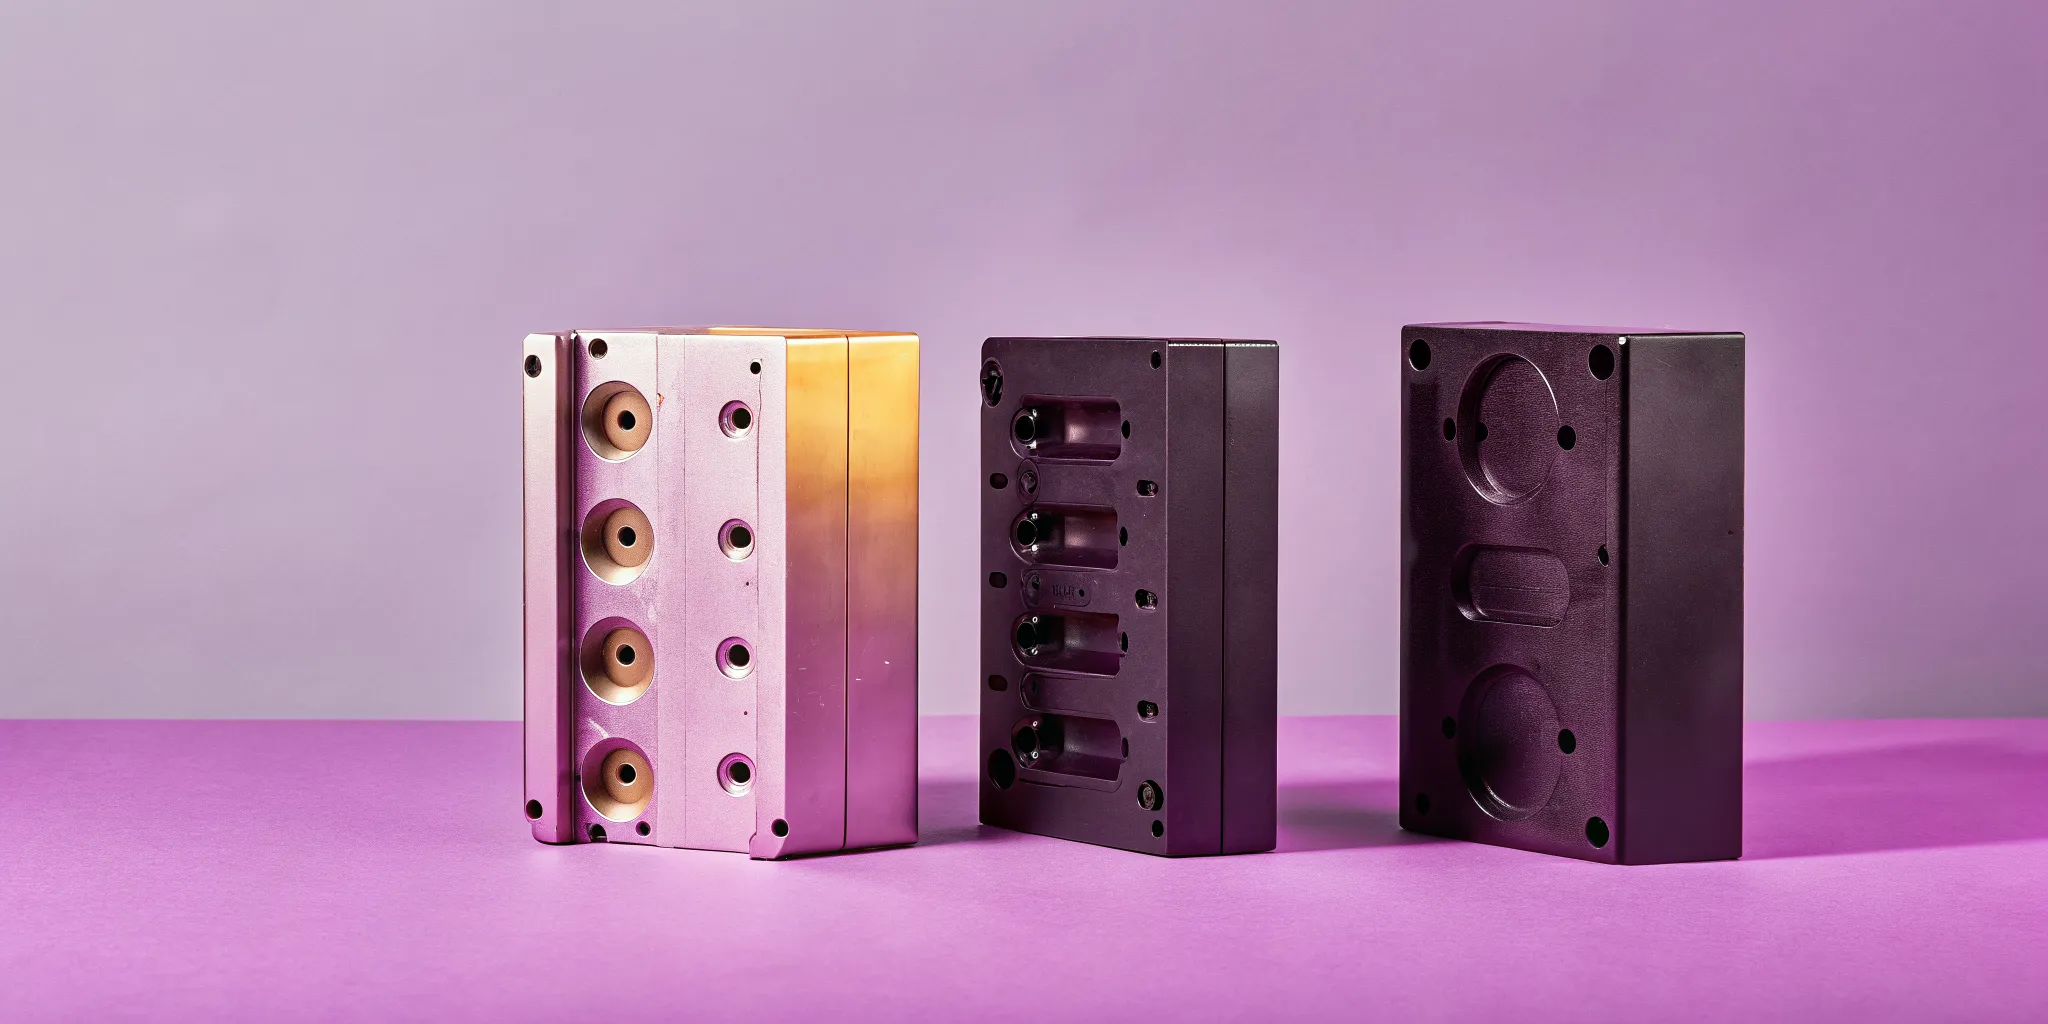
What Are T0, T1, and T2 Samples in Injection Molding?
When you’re turning a creative concept into a physical product, the journey from a digital file to a mass-produced item involves a few critical checkpoints. In the world of plastic injection molding, these checkpoints are known as T0, T1, and T2 trials. Think of them as dress rehearsals for your product. Each stage gives us a chance to test, refine, and perfect the manufacturing tool (the mold) before we hit "go" on full production.
This structured sampling process is standard practice for a reason: it saves time, money, and headaches. By methodically reviewing parts at each stage, we can catch potential issues early, from tiny surface blemishes to functional fit problems. For agencies managing client expectations and tight campaign deadlines, understanding this process is key. It ensures the final product that lands in a customer's hands is exactly what you envisioned, without any last-minute surprises.
What Do These Terms Mean?
The "T" in T0, T1, and T2 stands for "trial." Each number marks a distinct phase of testing and refinement for your custom mold.
T0: This is the very first time the mold is used. The main goal here isn't to create a perfect part, but to confirm the mold functions correctly. We check if plastic flows into all the cavities and if the basic mechanics of the tool work as designed. These first parts are usually for internal review only.
T1: This is the first big moment. The T1 sample is the first part that’s ready for your review. We use the correct material and make initial adjustments to the machine settings to produce a sample that we can measure and inspect. You’ll get to see and feel the first real version of your product.
T2: After you provide feedback on the T1 samples, we make adjustments to the tool and run the T2 trial. These samples incorporate all the refinements, getting us much closer to the final, approved part that’s ready for mass production.
Why These Stages Are Critical for Your Project
Moving through the T-stages might seem like an extra step, but it’s the most effective way to guarantee a high-quality outcome. This iterative process is all about risk management. Catching a dimensional error or a cosmetic flaw during the T1 trial allows us to fix the steel tool before you’ve committed to producing thousands of units. Making changes to a hardened steel mold is expensive and time-consuming, so finding problems early is a huge budget-saver.
For your project, these trials are your opportunity to validate the design, function, and feel of the product. It’s where we ensure the color is perfect, the texture is right, and all the parts fit together flawlessly. Taking the time to properly review each sample stage leads to a smoother, more predictable, and cost-effective path to mass production. It’s how we make sure the final product lives up to the creative vision you sold to your client.
The Goal of Each Trial Stage
Think of the T-stages as a series of dress rehearsals for your product. Each trial has a distinct purpose, moving your custom tool from a rough first draft to a production-ready asset. The goal isn’t to get a perfect part on the first try. Instead, it’s an iterative process of testing, measuring, and refining. By breaking the process into stages, we can systematically identify and solve issues, ensuring the final parts are exactly what you envisioned for your campaign or product launch. This methodical approach is what separates a smooth project from a stressful one, giving your team clear checkpoints for review and approval.
This structured approach is crucial for managing the injection molding process efficiently. It prevents costly mistakes down the line by confirming the tool’s basic function before moving on to fine-tuning details like surface texture or color. For your agency, understanding the goal of each stage helps you know what to look for, what feedback to give, and how to manage client expectations. It transforms a complex manufacturing process into a clear, step-by-step journey from concept to reality. When you can confidently explain to your client why the first samples aren't perfect and what the next steps are, you build trust and maintain control over the project's narrative.
T0: Test the Mold's Basic Function
The T0 trial is the very first time plastic is injected into your newly created mold. The single goal here is to see if the tool works on a fundamental level. The manufacturer is checking for major, show-stopping problems. Does the plastic fill the entire cavity? Do the two halves of the mold close properly? Can the part be ejected without breaking?
At this point, we aren't worried about aesthetics, precise measurements, or color. The parts produced might have flaws, and that’s completely normal. T0 is an internal engineering check, and often these first samples aren’t even sent to you. It’s all about confirming the mold’s basic mechanical integrity before we invest time in refining the output.
T1: Review the First Samples
This is where you and your team get involved. The T1 trial produces the first set of samples for your review. After the T0 trial, the manufacturer has likely made a few small adjustments to the tool or the machine settings. Now, the goal is to see how the part measures up to your original design.
You’ll get to hold the first real versions of your product, which is always an exciting moment. During this stage, we focus on assessing key factors like dimensional accuracy against the CAD files, the overall surface finish, and the part’s basic function. Do the different components fit together as intended? This is your first and most important opportunity to provide detailed feedback for refinement.
T2: Finalize for Mass Production
The T2 trial is all about dialing in the final details. Based on the feedback from the T1 review, the toolmaker will have made precise adjustments to the mold. The goal of this stage is to produce samples that are nearly identical to what you can expect from a full production run. The machine settings, like injection pressure, cooling time, and temperature, are also optimized to create a consistent, high-quality part.
At this point, we are confirming that all previous issues have been resolved. We’re checking for a perfect match on color, texture, and fit. The T2 samples should represent the final, approved product. Once you sign off on these parts, the tool is considered ready for mass production.
What to Expect During Each Trial
The journey from a digital design to a physical product involves a series of checkpoints called trials. Each trial, labeled T0, T1, and T2, has a specific mission in the injection molding process. Understanding what happens at each stage helps you know what to look for, when to give feedback, and how we get your product ready for launch. Think of it as a structured series of dress rehearsals, where we systematically refine everything from the tool's basic function to the final product's texture and fit. This iterative process is designed to catch issues early, saving time and money while ensuring the final result perfectly matches your creative vision. It’s how we de-risk the transition from concept to reality, making sure the tangible product you deliver is as impressive as the campaign it supports. Let's walk through what you can expect at every step.
T0 Trial: Checking Material Flow and Mold Operation
Think of the T0 trial as the mold's first technical run-through. This is our very first shot, and its main purpose is to see if the mold works on a basic mechanical level. The parts that come out at this stage are almost never perfect. You can expect to see flaws like incomplete sections, warping, or extra bits of plastic. That’s completely normal! Our engineering team isn't focused on aesthetics here. Instead, we’re checking for major issues with the mold itself and ensuring the molten plastic flows correctly into every cavity. It’s a crucial first step to confirm the fundamental engineering is sound before we move on.
T1 Trial: Validating the Design and Fit
This is the exciting part where you get your hands on the first official samples. After we’ve made initial adjustments from the T0 trial, the T1 samples are produced under normal operating conditions. The goal here is to validate the design and see how the parts look and feel. You’ll carefully review these samples to check the overall appearance, dimensions, and how they fit with any other components. Your feedback is critical at this stage. This is your opportunity to provide detailed notes on anything that doesn’t align with your vision. Clear, actionable feedback ensures the next version gets even closer to perfect.
T2 Trial: Making Final Tweaks for Production
The T2 trial is all about refinement. We take the detailed feedback from your T1 review and fine-tune the mold and machine settings. The samples produced during this stage should look and feel very close to the final product. These parts are high-quality enough for more advanced testing, like verifying functionality, checking the fit in a final assembly, or even sharing with key stakeholders for approval. The main objective is to confirm that all previous issues have been resolved and the product is ready for full-scale production. This is the last major checkpoint before we get the green light to start manufacturing your product in volume.
Common Problems to Watch For
The tooling trial process is designed to catch problems before they become expensive headaches during mass production. As your engineering partner, we manage this process, but it’s helpful for you to know what we’re looking for. These trials are all about spotting imperfections and refining the mold until every part comes out exactly as planned. Here are some of the most common issues we identify and resolve during the T0, T1, and T2 stages.
Material Flow and Filling Issues
One of the first things we check is whether the molten plastic flows correctly and fills the entire mold cavity. When it doesn't, you can get "short shots," which are incomplete parts with missing features. This can happen if the material is too cool or the injection pressure is too low. These kinds of problems are typically identified during initial mold trials, which is why this early testing phase is so important. We analyze the flow to ensure every detail of your design is perfectly formed, preventing defects that could compromise the product’s structure or appearance.
Surface Defects and Finish Problems
For any branded product, the final look and feel are everything. Surface defects can ruin the user experience and make a high-quality product feel cheap. We meticulously inspect samples for issues like sink marks (small depressions), flash (thin excess plastic on the edges), or burn marks. Catching these aesthetic flaws early allows us to make precise adjustments to the mold or the injection process. Ensuring a flawless surface finish is critical, especially for consumer-facing products where visual perfection is non-negotiable. It’s all about making sure the final part is as beautiful as it is functional.
Dimensional and Tolerance Inaccuracies
A part might look perfect, but if it doesn’t fit with other components, it’s a failure. Dimensional inaccuracies happen when a part doesn't match the CAD model's exact measurements, often due to material shrinkage or warping as it cools. We conduct thorough measurements to confirm every part meets the required tolerances and specifications. This is especially critical for complex assemblies or products with tight-fitting components. Verifying these dimensions ensures that when it’s time for assembly, everything snaps together just as it was designed to, without any surprises.
Ejection and Cooling Issues
Once a part is molded, it needs to come out of the tool cleanly. Ejection issues can cause parts to stick, which can damage both the product and the expensive mold itself. We also look at how the part cools. An improper cooling system can create uneven temperatures across the mold, leading to warping or internal stresses in the plastic. This can compromise the part’s strength and shape. We fine-tune the ejection pins and cooling channels to ensure every part is released smoothly and cools uniformly, guaranteeing consistency and quality across the entire production run.
How Trials Impact Your Timeline and Budget
The tooling trial process is where your digital design meets physical reality, and it has a direct impact on your project's two most critical resources: time and money. For agencies managing client expectations, this phase is everything. While it might feel like these back-and-forth revisions are slowing things down, they are actually your best defense against much bigger, more expensive problems down the line. Catching a flaw during a T1 trial is a manageable adjustment; discovering that same flaw in 10,000 finished units is a catastrophe that can derail a campaign and damage a client relationship.
Think of the trial stages as built-in insurance for your production run. Each step is designed to systematically eliminate risks, from the way the plastic flows into the mold to the final texture of the product. This is not just about engineering precision; it's about brand integrity. A poorly molded part can make a premium product feel cheap. Understanding how these trials affect your schedule and costs allows you to build realistic timelines, set clear expectations with your clients, and manage the project with confidence. A well-planned trial process doesn't just create a better product; it protects your budget, your timeline, and your reputation.
How Each Stage Affects Your Timeline
The injection molding trial process is sequential, meaning each stage builds on the last. You can’t move to T1 until the T0 issues are resolved, and so on. This step-by-step validation is essential for quality, but you need to account for it in your project plan. The complete plastic injection molding timeline, from initial design to mass production, can take anywhere from six to 19 weeks. Each trial and the subsequent adjustments typically add one to three weeks to the schedule. The T1 stage often requires the most time for review, as you’re checking everything from fit to aesthetics. Factoring in shipping time for samples adds to the timeline, so it’s crucial to build a realistic schedule from the start.
The Cost of Reworking Your Tool
Modifying a steel injection mold is a precise and often expensive task. The cost isn't just in the materials; it's in the highly skilled labor and specialized machinery required to make changes. Simple adjustments, like tweaking a dimension, might be straightforward. However, more complex changes, such as fixing a warp or a surface blemish, can require welding new material onto the tool and then re-machining it, which adds significant cost. This is why the trial stages are so important. Taking the time to properly review each set of samples helps you find and fix issues early, leading to a more reliable and less expensive production process. Skipping this step is like sending a major client presentation to print without a final proofread; it’s a gamble that can cost you dearly.
How to Budget for Tooling Development
When you’re planning your budget, it’s wise to assume that your tool will need at least one round of revisions. It’s extremely rare for a complex tool to be perfect on the very first run. A good rule of thumb is to add a contingency of 10% to 15% to your tooling budget to cover potential modifications. For your timeline, plan for an extra one to two weeks to accommodate any unexpected delays. Clear communication with your manufacturing partner is key. Before you begin, make sure you understand their process and how they quote for revisions. Understanding the different sample stages helps you have more productive conversations with your supplier and gives you greater control over your project’s outcome.
Key Metrics to Track for Quality
Once you have physical samples in hand, the review process becomes much more than a simple "does it look right?" gut check. This is where we move from creative vision to engineering validation. To ensure your final product is flawless, we focus on objective, measurable data. Tracking specific metrics during the T0, T1, and T2 trials is how we confirm the tool is performing exactly as designed and is ready for mass production.
Think of these metrics as a quality control checklist. They help us spot and solve potential issues before they become expensive problems that could derail your campaign launch. By focusing on the right data points, we can fine-tune the manufacturing process to deliver a product that is not only beautiful but also functional, durable, and cost-effective. This systematic approach ensures every single unit meets the high standards your brand and your clients expect.
Verify Dimensions and Tolerances
Every product is designed with precise measurements, and even tiny deviations can cause big problems, like parts not fitting together or a device failing to function. During the T-trials, we meticulously measure the samples to ensure they match the specifications in the CAD files. The goal of the T1 trial is to assess key factors like dimensional accuracy, surface finish, and overall part functionality. We use precision tools like calipers and CMM scanners to verify every critical dimension is within its specified tolerance, which is the small range of acceptable variation. This step is essential for creating a reliable, high-quality product.
Assess Surface Finish Quality
For any branded product, the look and feel are everything. The surface finish communicates quality and attention to detail. During the trials, we carefully inspect each sample for cosmetic defects like sink marks (small depressions), flash (excess plastic on the edges), or inconsistent textures. By the T1 stage, the samples should be very close to the final design and ready for your team to inspect and approve. A perfect surface finish is a sign of a well-designed tool and a dialed-in process, ensuring the final product represents your brand beautifully.
Measure Cycle Time and Efficiency
Cycle time is the total time it takes to produce one complete part, from injecting the plastic to ejecting the finished piece. This metric is a direct indicator of manufacturing efficiency and cost. A shorter cycle time means a lower cost per part and a faster path to getting your products ready for market. Mold trials are tests done to check and improve the function of a mold before it’s used for mass production. By analyzing the cycle time, we can optimize settings like temperature, pressure, and cooling time to make the process as efficient as possible without compromising quality.
Analyze Material Use and Waste
A well-engineered tool isn’t just effective; it’s also efficient with materials. During injection molding, plastic flows through channels called runners to fill the part cavity. Our goal is to design a tool that minimizes the amount of plastic left in these runners, as this material often becomes waste. These trials help find problems, make parts better, and ensure the mold is ready for making many parts with minimal waste. Reducing material consumption not only lowers the cost per part but also supports more sustainable manufacturing practices, which is a win for your budget and your brand’s reputation.
How to Ensure Clear Communication
The tooling trial process is a conversation between your design team and your manufacturer. Like any good conversation, it relies on clarity, shared understanding, and a solid feedback loop. Miscommunication is one of the biggest reasons for project delays and budget overruns, but it’s also one of the most preventable. Establishing clear communication protocols from day one ensures that everyone is working toward the same goal: a perfect final product. It transforms the process from a series of transactions into a true partnership, where both sides are invested in getting every detail right. A little planning upfront can save you from major headaches down the road.
Set Clear Expectations with Your Manufacturer
Before you even begin a project, you need to align with your toolmaker on what T0, T1, and T2 actually mean for your specific product. Don't assume everyone shares the same definitions. Talk through what you expect to see at each sampling stage. For example, should the T1 samples be molded in the final production material and color? Do you require a first article inspection report with them? A great way to formalize this is by creating a simple quality control checklist that outlines the criteria for approval at each step. This document acts as your single source of truth, preventing misunderstandings and ensuring your manufacturer knows exactly what you need to see before moving forward.
Create a System for Feedback and Documentation
When you receive samples, the clock is ticking. Your manufacturer is waiting for your feedback to make adjustments and proceed to the next stage. To keep the project moving, you need an efficient system for providing clear, consolidated feedback. Avoid long, confusing email chains where important details can get lost. Instead, create a shared document or use a project management tool where your team can leave time-stamped comments, annotate photos, and list required changes. Be specific. Instead of saying a part "feels wrong," explain that "the wall thickness is 0.5mm under spec in this location." This creates a documented feedback loop that serves as a clear record of requested changes.
Establish a Protocol for Solving Issues
Even with the best planning, you might run into issues. A T1 sample might have a sink mark, or a dimension might be out of tolerance. Instead of reacting to problems as they appear, establish a protocol for solving them from the start. Discuss with your manufacturer how issues will be handled. Who is responsible for the cost of tool modifications if the error stems from a manufacturing defect versus a design change? How will you verify that the issue has been resolved in the next set of samples? Taking the time to properly check each stage and address issues systematically leads to a more reliable and cost-effective production process. Don’t rush it; a patient, methodical approach always wins in the long run.
Best Practices for a Smooth Trial Process
Getting through the T0, T1, and T2 trials smoothly isn’t about crossing your fingers and hoping for the best. It’s about having a clear, proactive strategy. When you’re managing a creative project for a client, the last thing you want are unexpected delays or budget overruns because of tooling issues. A well-managed trial process keeps your project on track and ensures the final product lives up to the original vision.
Think of these best practices as your playbook for turning a complex manufacturing step into a predictable, controlled process. By focusing on systematic checks, clear communication, and the right tools, you can guide your physical product from a concept to a production-ready reality with confidence. It’s all about catching potential problems early, making smart decisions, and keeping every team member on the same page.
Implement Systematic Quality Checks
At each trial stage, you need a consistent way to evaluate the samples. This goes beyond a quick visual inspection. A systematic approach means you’re comparing the physical part against the original design files and technical specifications. The goal of the T1 trial is to assess key factors like dimensional accuracy, surface finish, and overall part functionality. Create a detailed checklist for each trial that covers every critical feature of your design.
Taking the time to properly check each stage leads to a more reliable and cheaper production process. Your quality check should include measurements with calipers, fit tests with other components, and a close review of cosmetic details. Documenting everything with photos and notes creates a clear record of what needs to be adjusted for the next trial, ensuring nothing gets missed.
Manage Communication Between Teams
Clear and consistent communication between your agency, your design partner, and the manufacturer is the glue that holds the trial process together. Understanding these stages helps you talk effectively with your supplier and manage project timelines. Before the first trial even begins, everyone should agree on the goals and expectations for each stage.
For instance, you should clearly explain what you expect from the T1 samples. Do they need to be molded in the final production material? Should they be a specific color? Do you require a formal inspection report with measurements? Establishing these details upfront prevents misunderstandings and ensures the feedback you provide is actionable. A shared project management space or a simple, well-organized document can keep all feedback and approvals in one place.
Use Tools to Streamline the Process
Modern tools can help you anticipate and solve problems before your mold is even made. Using computer simulation tools, often called CAE, allows engineers to predict how the plastic will flow into the mold. This digital analysis helps identify potential issues like air traps or weak spots, saving time and reducing the number of physical tests needed. It’s like having a dress rehearsal for your part before committing to steel.
A smart tooling strategy also helps lower overall costs and speeds up the process. This involves deciding whether a simpler prototype tool is sufficient for initial runs or if you need to invest in a high-volume production tool from the start. Your engineering partner can help you make this call based on your project’s goals, ensuring your investment aligns perfectly with your client’s needs.
How to Move from T2 to Full Production
You’ve made it through the initial trials, and your T2 samples are looking sharp. This is a huge milestone, but don’t pop the champagne just yet. The transition from final samples to full-scale production is a critical phase where attention to detail is everything. This is where you formalize your approval, run final checks, and create a clear plan to ensure the first production unit is as perfect as the last. Getting this handoff right prevents costly errors and ensures your client’s vision is executed flawlessly when it’s time to manufacture at scale.
Define Your Production Approval Criteria
Before giving the green light for mass production, you need a clear, non-negotiable checklist. Think of this as your final sign-off agreement. Your production approval criteria should outline every requirement the T2 samples must meet, from dimensional tolerances and color matching to surface finish and functional tests. When the parts pass these final checks, the mold is officially approved. For highly complex products, you might even need more trials (T3, T4, etc.) to get everything perfect. Documenting these criteria ensures everyone is aligned and protects your project from any "good enough" compromises.
Complete the Final Quality Checks
Now it’s time to get hands-on with the T2 samples. At this stage, the mold and machine settings have been fine-tuned, so the goal is to produce parts that are extremely close to final production quality. They should have better dimensional accuracy, a clean aesthetic, and be highly consistent. Your job is to verify this. Get out your calipers, compare the samples to your CAD files, and test their fit. Check for lingering cosmetic issues like sink marks or flash. This is your last chance to catch subtle flaws before committing to a large run. A thorough quality inspection is non-negotiable.
Plan Your Transition to Manufacturing
Approving the T2 sample is just one part of the equation; the other is planning the handoff to the production team. A proper check at each stage leads to a more reliable process. Communicate with your supplier to lock in the final machine parameters, cycle times, and material specifications used to create the approved samples. This ensures consistency. You’ll also want to finalize packaging plans, assembly instructions, and the production schedule. Clear communication with your manufacturer is key to making sure the first official production run goes off without a hitch.
Related Articles
- DFM for Injection Molding: The Ultimate Guide
- Warpage Control: 9 Tips for Flawless Parts
- Overmolding Design 101: The Ultimate Guide
Frequently Asked Questions
Is it possible to skip a trial stage to save time? While it might seem tempting to rush the process, skipping a trial stage is a huge gamble. Think of it like skipping a final proofread on a major print campaign. Each stage is designed to catch different types of problems early, when they are relatively easy and inexpensive to fix. Finding a dimensional error during the T1 trial is a straightforward adjustment; finding that same error after you’ve produced 10,000 units can derail your entire project. The structured trial process is your best insurance against costly mistakes and delays down the line.
What is my main responsibility when I receive T1 samples? When you get your T1 samples, your job is to be a meticulous critic. This is your first and most important chance to validate the physical part against your digital design. You should check everything from the critical dimensions and tolerances to the overall look and feel. Does it fit with other components? Is the surface finish what you expected? The more specific and detailed your feedback is, the more effective the T2 revisions will be. Clear, actionable notes are essential to getting the final product just right.
How long does the trial process typically add to a project timeline? It’s smart to plan for each trial stage to add between one and three weeks to your timeline. This accounts for the time it takes to produce the samples, ship them to you for review, gather feedback from your team and client, and for the manufacturer to make any necessary adjustments to the tool. Building this time into your project plan from the very beginning is the best way to manage expectations and ensure a smooth, predictable launch.
What happens if the T2 samples still aren't perfect? It’s not unusual for highly complex products to require more than one round of revisions. If the T2 samples don't meet all the approval criteria, we simply move on to a T3 trial. We’ll analyze the feedback from the T2 review, make further precise adjustments to the mold or the machine settings, and produce a new set of samples. The process is iterative by design, and we continue refining until you can hold a sample in your hand and confidently say, "This is it."
Who pays for tool modifications discovered during the trials? This generally depends on the reason for the change. If the tool fails to produce a part that matches the approved CAD design, the manufacturer is typically responsible for the cost of modifications. However, if you decide to make a design change after reviewing a physical sample, that is considered a design revision, and the cost for the tool update would be your responsibility. This is why it’s so important to finalize your design before we start cutting steel.