At Formnext 2026, which opened in Frankfurt on November 17, iAM Marketplace put live injection molding with 3D-printed mold inserts on its show program, and Stratasys unveiled its H550 production 3D printer. Both point to the same shift: 3D printing is moving closer to production.
Key takeaways
- Printed mold inserts let teams test a part in its real production plastic before paying for metal tooling. They do not replace production molds.
- Some problems, such as snap-fit fatigue, living-hinge behavior and sealing, only show up reliably on molded parts. Printed prototypes cannot show them.
- iAM Marketplace says there is no universal shot count for its printed inserts. Tool life depends on geometry, resin and molding conditions, so plan for prototype and pilot quantities, not mass production.
- A printed insert only teaches useful lessons if the part follows production design rules: draft, wall thickness, gates and ejection.
- Formnext's production-printer launches mean teams should decide early whether a low-volume part will be molded or printed in production.
Why a prototype development company cares about printed mold inserts
Most plastic consumer products are made by injection molding. Molten plastic is forced into a mold, cooled and ejected. The mold, usually called tooling, is machined from aluminum or hardened steel. It is typically one of the biggest costs and longest lead times in a hardware program, and it is expensive to change once it is cut.
Teams have long worked around that risk with 3D-printed prototypes. Printed parts are good for checking size, fit and ergonomics, but they are made of different materials, built in layers, and lack the flow lines, shrinkage and stresses of a molded part. Printed mold inserts sit between the two. The cavity, the part of the mold that shapes the product, is printed in a rigid resin, fitted into a mold base, and filled with real thermoplastic.
What was reported at Formnext 2026
Printed inserts, molded live. On its Formnext 2026 page, iAM Marketplace says its booth (Hall 12.1, D61) features live injection molding with 3D-printed molding inserts on an APSX-PIM V3 compact molding machine, with demonstrations planned twice daily during the November 17–20 show. It presents two routes. Ultracur3D RG 3280 is a ceramic-filled, high-stiffness resin for rigid inserts used in repeated trials when the part can be pulled from the mold mechanically. Ultracur3D xMOLD makes dissolvable molds for undercuts and complex geometry. The company's rapid injection molding page says each xMOLD tool is used once.
Materials and limits. The same page lists ABS, PP, PC, POM and glass-filled PP, PA6.6 and PBT among materials explored with RG 3280. It says the resin has validated profiles for the Formlabs Form 4 in Open Material Mode. It states that "there is no universal cycle count" for RG 3280 inserts and that its material data are "reference values, not guaranteed mold life or process limits."
Reported projects. iAM Marketplace cites customer projects: MD ELEKTRONIK molding more than 60 cable-overmolding prototypes in 90 minutes with little to no insert wear, and testing in the series material to "identify issues before investing in steel tooling." It also cites Becton Dickinson producing more than 100 PP and more than 100 PC development parts. In a November 16 preview, trade site Plus4Plast reported that, according to the resin's processing guide, inserts last about 1,000 shots in unfilled ABS, POM and PC and about 100 shots in glass-filled grades, and that iAM Marketplace estimates 48–72 hours from CAD to molded parts.
Production printing. In a November 17 release, Stratasys introduced the H550, a powder bed fusion printer with a 34.2-liter build volume and a 450 mm long axis, aimed at final-part production. The company claims up to 30% lower total cost of ownership than comparable print-and-fuse systems, with commercial availability planned for Q2 2027. Engineering.com's Day 1 recap also covered Nikon SLM Solutions' MACHX metal printers for series production.
Where printed inserts fit between 3D prints and steel tools
This section and the next are Jackson Hedden analysis based on general product development practice. We have not tested these materials or machines.
Use them to answer material questions. A living hinge in polypropylene, a snap fit that has to survive hundreds of cycles, or a gasket groove that has to seal all depend on how the actual resin flows, cools and orients. A printed insert lets a team see those behaviors weeks before the production tool exists. It also lets them run drop tests and fatigue tests on parts made of the right material.
Expect the insert to behave differently from steel. Resin inserts carry heat away far more slowly than metal, so cooling, shrinkage, surface finish and cycle time will not match production. Treat dimensions and cosmetics from printed tooling as directional. Final dimensions belong to T1 samples, the first shots from the production tool.
Design the test part like a production part. A printed insert still needs draft (a slight taper so the part releases), consistent wall thickness, vents, gates and an ejection plan. Skipping these rules to get a part faster defeats the purpose, because the lessons won't carry over to the real tool. That is why design for manufacturing (DFM), shaping parts so they can be made reliably at the target cost, belongs in the loop even at this stage.
Choose the volume path on purpose. Printers like the H550 make it more realistic for some low-volume parts, such as brackets, ducts or fixtures, to be printed in production. A part designed for printing and a part designed for molding look different. Deciding early avoids redesigning later.
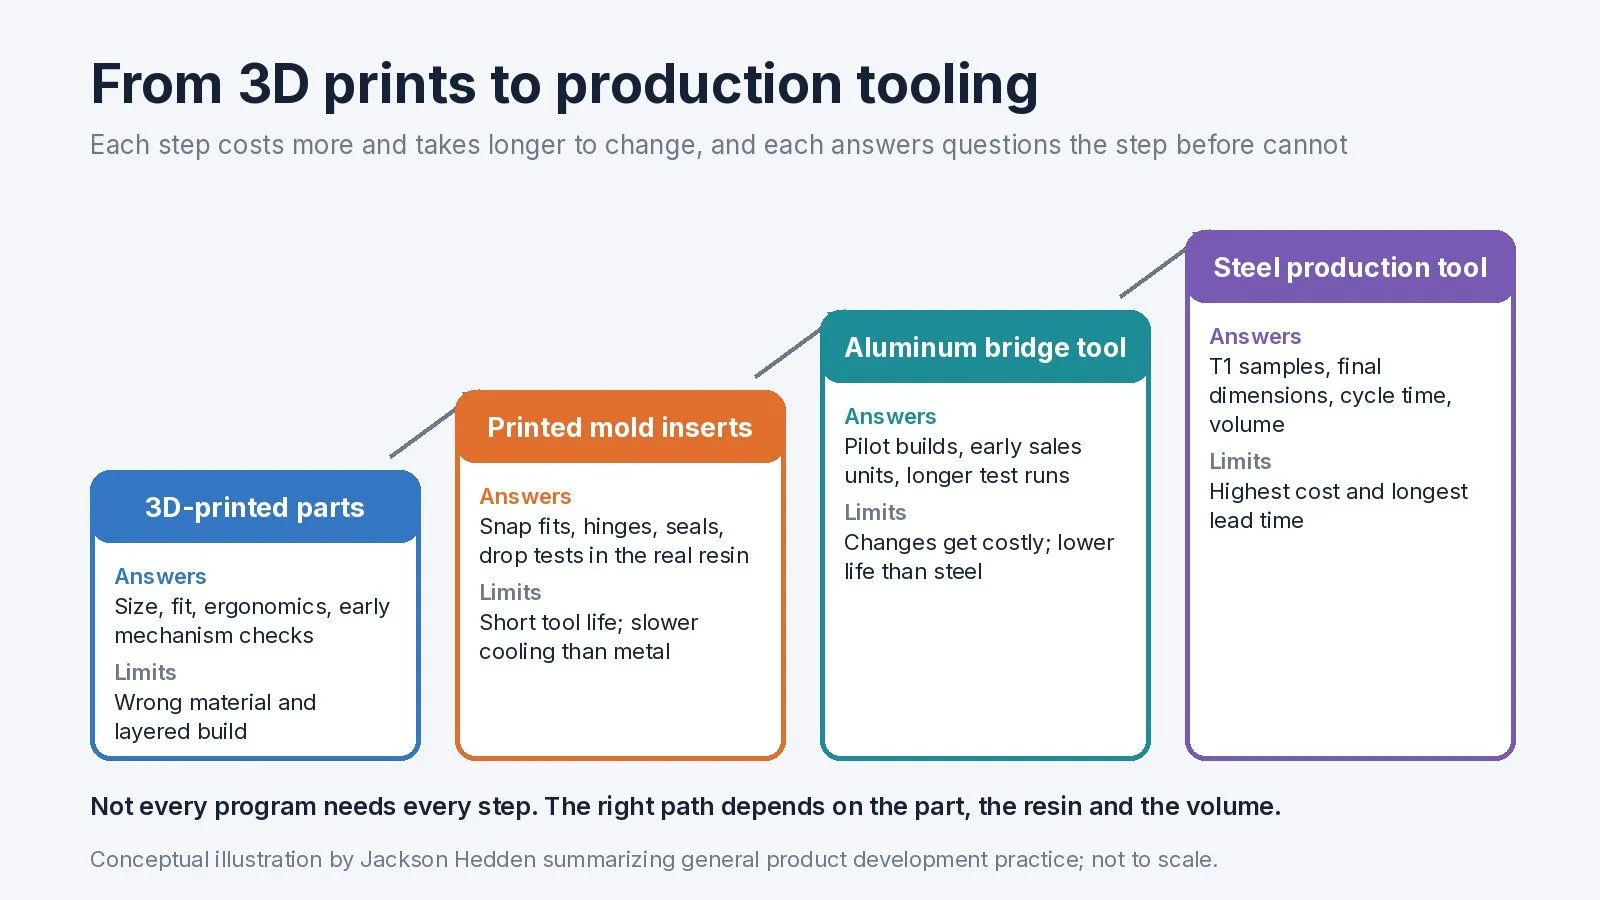
Each tooling step answers questions the one before cannot. Conceptual illustration by Jackson Hedden summarizing general product development practice.
What this means for product teams
- Name the question each molded prototype must answer. Snap-fit retention, hinge life, sealing and drop behavior are good candidates. Pure appearance is not.
- Mold in the intended resin grade. The value is in the material. Use the same grade, including glass fill or colorant, that production will use, if the insert can handle it.
- Put printed tooling in EVT. EVT (engineering validation test) proves the design works. Molded parts from printed inserts can find material problems there, so that DVT (design validation test) parts from production-intent tooling confirm fixes rather than discover them.
- Bring the molder in early. Share the part with your injection molder before printing inserts. Gate location and parting lines (where the mold halves meet) should match what the production tool will use.
- Budget the iterations. Plan two or three insert revisions and the tests between them, rather than counting on one perfect shot.
A good prototype development company will help you decide which questions need molded parts and which can be answered with a printed prototype. Our look at Raise3D's large-format printers covers matching prototype questions to processes, and the LightMake L4 trial production story shows what still surfaces once production tooling arrives.
If you are planning a plastic product and want to test it in the real material before committing to tooling, see how we work as a prototype development company with suppliers, or contact us to talk through your project.
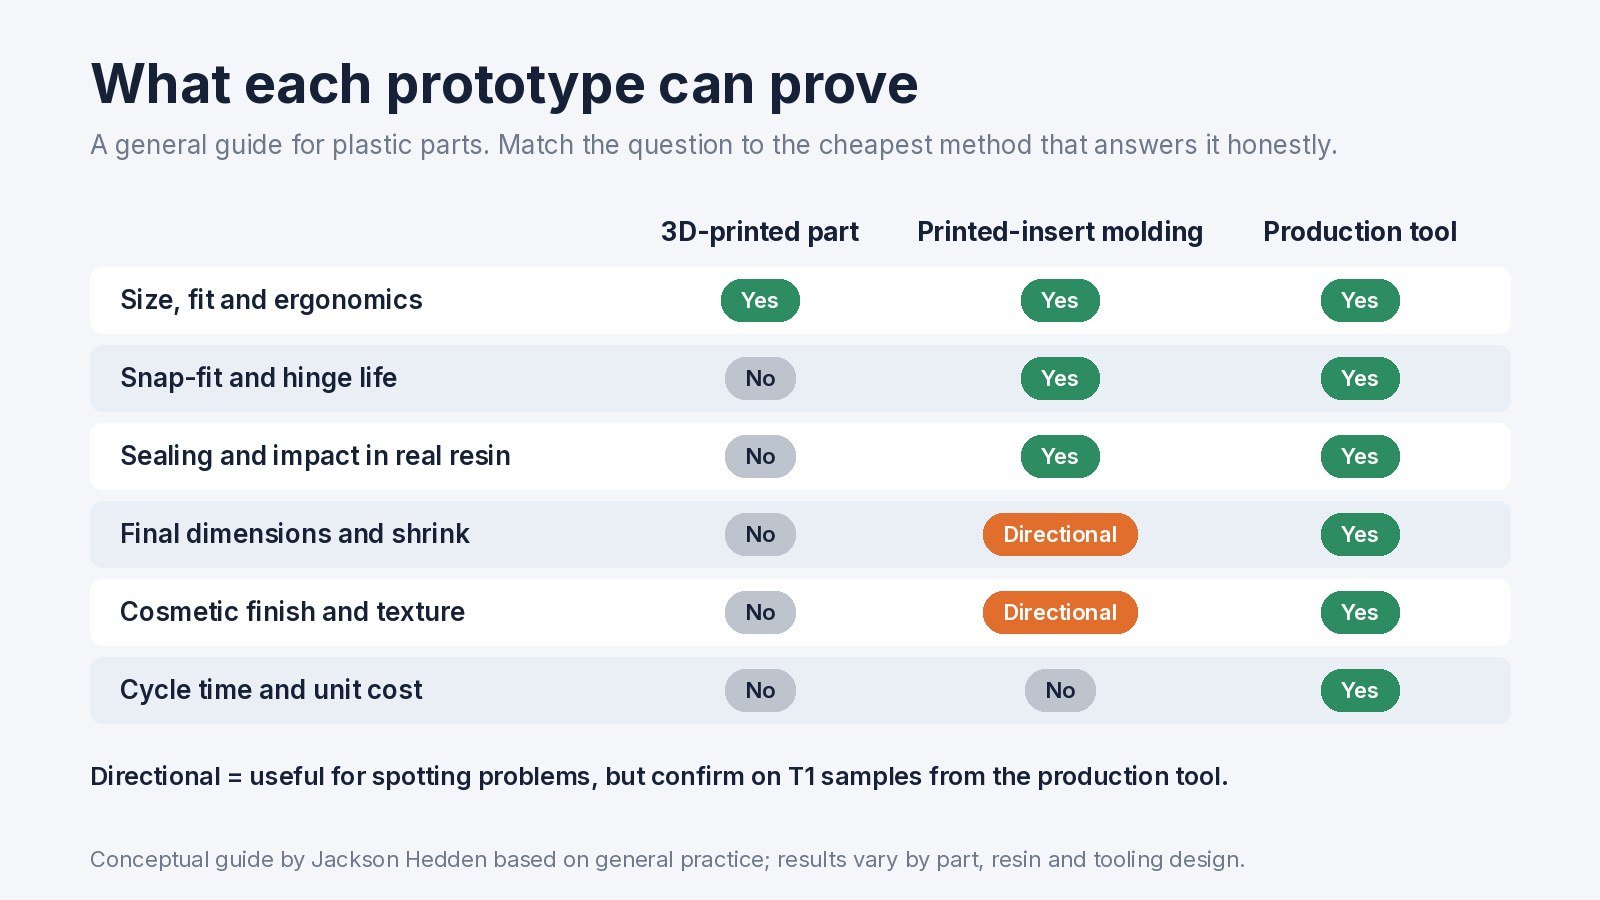
Match each question to the cheapest method that answers it honestly. Conceptual guide by Jackson Hedden; results vary by part, resin and tooling design.
Frequently asked questions
What is a 3D-printed mold insert? It is the shaping part of an injection mold, printed in a stiff, heat-resistant resin instead of machined from metal. It fits into a mold base and produces real thermoplastic parts, usually in small quantities for testing.
How many parts can a printed mold make? There is no single answer. iAM Marketplace says tool life depends on geometry, resin and molding conditions, and trade reporting on its resin cites roughly 100 to 1,000 shots depending on the plastic. That puts printed inserts in the prototype and pilot range, not mass production.
Do printed inserts replace aluminum or steel tooling? No. They help teams learn faster before tooling is cut. Higher volumes, large parts, tight cosmetic standards and stable cycle times still call for metal tools.
When should a product team use molded prototypes instead of 3D prints? Use them when the answer depends on the production material, such as snap fits, hinges, seals and impact strength. For size, ergonomics and early fit checks, ordinary 3D prints are usually faster and cheaper.
Jackson Hedden is a product design, development and manufacturing firm helping founders and product teams take consumer and industrial products from concept to production.
Sources
- iAM Marketplace, "Formnext 2026 – The Future of Choice. Live at Formnext" (event page for November 17–20, 2026; accessed November 18, 2026): https://i-am-marketplace.com/knowledge/trade-show/formnext-2026/
- iAM Marketplace, "Rapid injection molding: 3D printed molds with real thermoplastic parts" (accessed November 18, 2026): https://i-am-marketplace.com/solutions/rapid-injection-molding/
- Plus4Plast, "Live PP injection molding with 3D-printed inserts at Formnext 2026: 48-72 hours from CAD to part," November 16, 2026: https://plus4plast.com/en/news/live-pp-injection-molding-with-3d-printed-inserts-at-formnext-2026-48-72-hours
- Stratasys Ltd., "Stratasys Unveils H550 at Formnext 2026, Scaling Industrial Powder Bed Fusion for Production," Business Wire, November 17, 2026: https://investors.stratasys.com/news-events/press-releases/detail/999/stratasys-unveils-h550-at-formnext-2026-scaling
- Engineering.com, "Formnext 2026 – Day 1 Recap," November 17, 2026: https://www.engineering.com/formnext-2026-day-1-recap/